Stacey A. Shannon is a freelance journalist and blogger who has been published internationally. She's also a Christian, a wife and a mom of two school-aged children. She started Families with Grace in 2019 to encourage Christian moms as they create homes filled with grace, love and faith.
Be sure to get the FREE family devotion book, "Finding Grace at Home: 7 Days of 5 Minute Devotions for Families." It's a great way to help your family draw closer to each other and to God.
Motherhood can be lonely. You weren't meant to go on your motherhood journey alone. Connect with Stacey and other Christian moms like you in the private Facebook group, Moms with Grace!
And check out the books from Stacey A. Shannon as well!
Using the microwave and the oven for baked potatoes speeds up cooking time without compromising texture!
I haven’t met a potato I didn’t like from cheesy party potatoes to mashed potatoes to potato soup to to french fries to potato chili, I love them all. When it comes to baked potatoes, I like them soft and tender. But baking them for hours isn’t really my jam. I don’t have time for that! Instead I take a trick from my mom using this microwave baked potato recipe. Because you start the potatoes in the microwave and finish them in the oven, they cook faster and you still get that nice oven-baked texture.
These microwave baked potatoes are incredibly easy. They’re perfect for weeknight or weekend dinners!
Microwave the baked potato
Turn your oven on to 450-degrees (F) to start preheating.
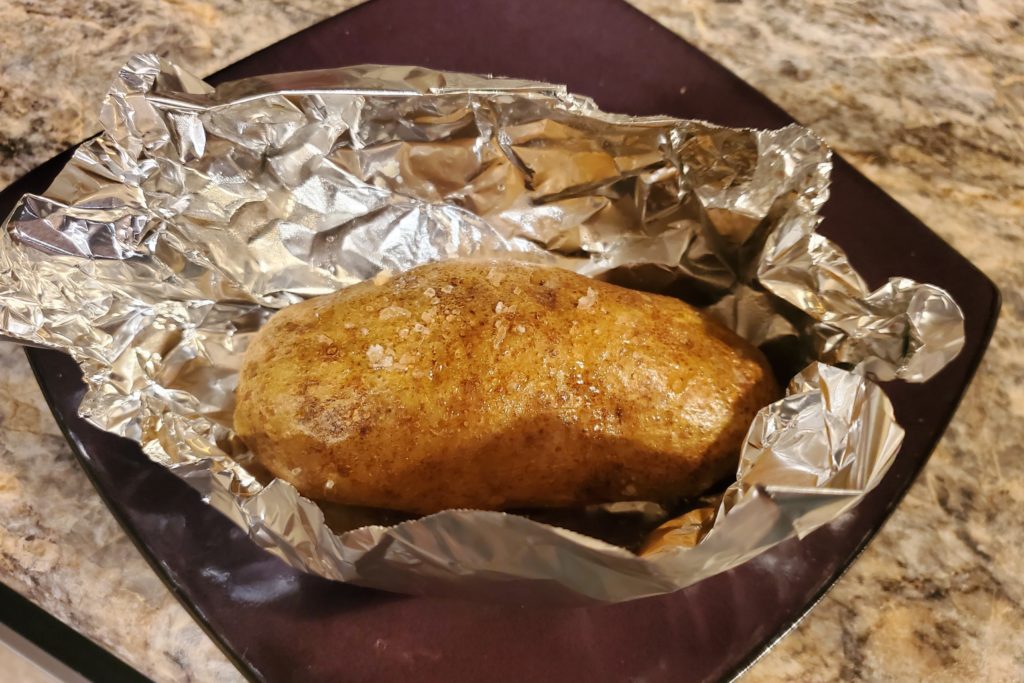
Before you put your baked potatoes in the microwave, you need to poke holes in the potatoes or else they will explode. I usually stab mine all over in random places with a fork. I don’t know that I need to make as many holes as I do, but I figure better safe than sorry. After all, I don’t want to clean up an exploded potato mess!
Put the potatoes on a microwave-safe plate, and then place them in the microwave. I cook them in the microwave at 100% power for about three minutes per potato. You can probably get away with two minutes per potato if they are smaller potatoes, but I usually do this with large ones and serve them as our main dish.
So, I cooked these three potatoes in the microwave for 12 minutes.
Prepare for the oven
A couple of minutes before the potatoes are finished in the microwave, I get set up to transfer them to the oven with a baking sheet, sheets of aluminum foil, vegetable oil with a tablespoon and coarse sea salt.
When the microwave stops, take the potatoes out. The potatoes will be hot, so use oven mitts to pick them up one at a time to transfer them to the foil sheets.
Once the potato is on a foil sheet, drizzle one tablespoon of vegetable oil over it.
Next, sprinkle the potato with the coarse sea salt, if desired.
Wrap the foil around the potatoes and place them onto a baking sheet. Cook them in the oven at 450-degrees (F) for 20 minutes.
Enjoy the potato
When the potatoes are finished cooking, take them out of the oven. Carefully open the foil to let them start to cool.
Cut the potato open carefully and use a fork to mash the inside a bit, if you like it that way. (I sure do!)
Add your favorite toppings and you’re good to go! We usually have baked potatoes as our main dish, so I loaded this one up with butter, cheese, sour cream and bacon bits. On the night I took these photos, we had a total carb fest. I also served up this delicious homemade french bread! Another great pairing for these baked potatoes is my mom’s meatloaf with ketchup glaze.
Microwave baked potato
This is the best microwave baked potato recipe because it starts in the microwave to cook faster but ends in the oven for a better texture.
baked potato toppings as desired like butter, sour cream, cheese, bacon bits, etc.
Instructions
Preheat the oven to 450-degrees (F).
Scrub your potatoes until they're clean. Pierce each potato in numerous places with a fork to make holes.
Put the potatoes on a microwave-safe plate and cook in the microwave for 3 minutes per large potato. (For three large potatoes, cook for 12 minutes.)
Just before the potatoes finish in the microwave, get out sheets of aluminum foil to hold the potatoes along with a baking sheet, the vegetable oil and the salt, if desired.
Carefully transfer one potato at a time to a sheet of aluminum foil. (I use oven mitts for this because the potatoes are hot!)
Drizzle the potatoes with 1 tablespoon each of the vegetable oil. Sprinkle with the salt, if desired.
Wrap the potatoes in the foil, place them on a baking sheet and cook in your preheated oven for 20 minutes.
Carefully peel back the foil from the baked potatoes, cut them and serve them with your favorite baked potato toppings.
Keyword baked potato, family dinner, family friendly, microwave cooking, potato, weeknight dinner
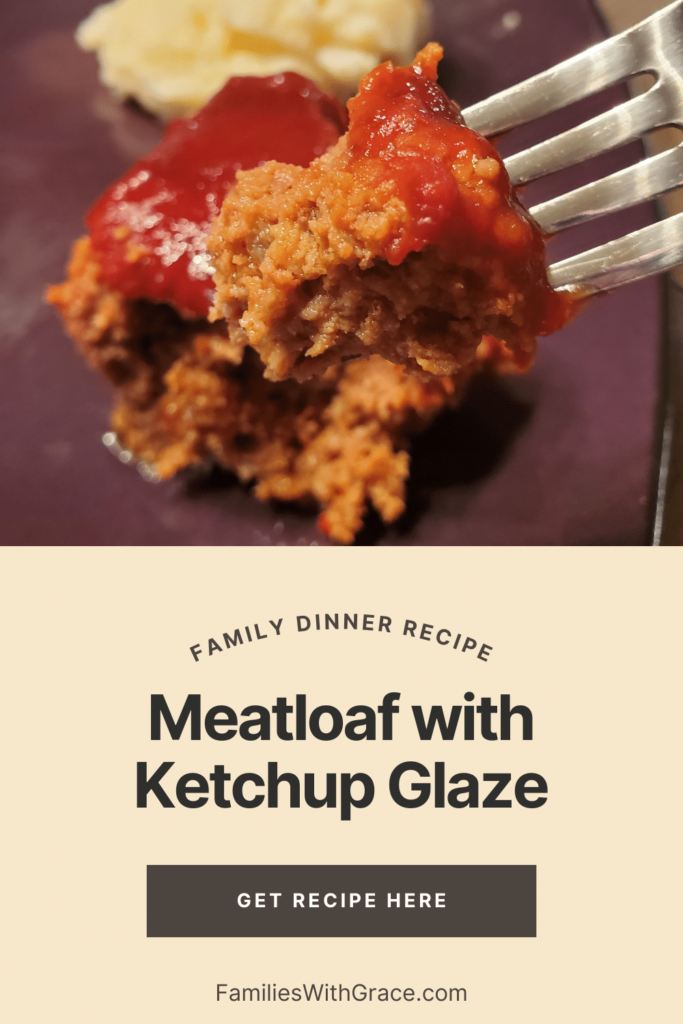
There are so many different ways to make meatloaf. I’ve seen it with brown gravy over the top. Sometimes it’s dry. Other times it’s spicy. But, my all-time favorite meatloaf recipe topped with ketchup glaze comes from my mama. It’s one of my favorite dishes she makes.
I hadn’t made meatloaf myself until more recently. My husband and son won’t eat it. They don’t eat much meat. But after trying various meal kit delivery services, I learned making two different dinner options was sometimes worth it. I tried out some meatloaf recipes, and they were good enough. However, they weren’t my mom’s.
For just over a year, my parents have lived states away from me instead of five minutes away from me. So when they were here for a visit in the fall, I asked my mom to make meatloaf. She not only made it, but also froze some meatloaf patties that my daughter and I enjoyed later on for dinners. When my parents were back for my son’s recent birthday, I knew I had to write down her recipe, take photos and share it with you guys as well!
This meatloaf recipe is home-cooking at its finest. It’s not fancy, but it’s hearty and delicious. Serve it up with mashed potatoes or cheesy party potatoes and oven-roasted vegetables for a complete meal.
Figure out the meat
So the issue here is what kind of meat to use. You can use all ground beef (we use chuck at 80/20 fat) or a mix of ground beef and ground pork or sausage. It’s good all the ways! This particular time, we made it with the mix of ground beef and ground pork, because I had some leftover ground pork I wanted to use.
If you do use a mixture of meat, you want to use 3/4 ground beef and about 1/4 ground pork or sausage. We used 2.5 pounds of meat total for five adults (with leftovers), which broke down to 2 pounds of ground beef and 1/2 pound of ground pork.
The fresher your meat is, the better the meatloaf will be. If you have a butcher or butcher’s case at your grocery store, go with ground meat from there. You don’t need it to be all-organic and grass-fed (unless that’s your thing). You just want fresh. However, this time around, we used frozen meat I had, and it was still incredibly good.
Mix up your meatloaf
Switch your oven on to 350-degrees (F) to get it preheating, and then start mixing your meatloaf. Put all of the meat into a large mixing bowl. Add 1 egg, 1 teaspoon of sage (unless you use sausage, in which case omit this), salt, pepper, 1/2 cup diced onion, 3 tablespoons of ketchup and 3 tablespoons of honey barbeque sauce.
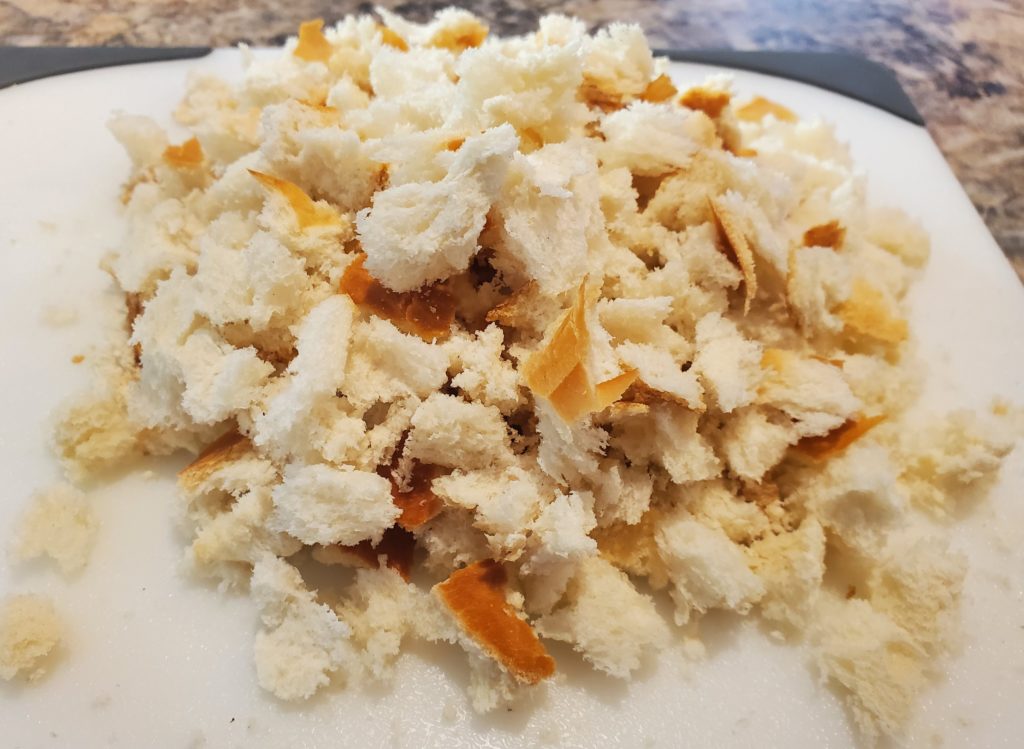
Cut up about three slices of bread into small pieces. You an use whatever bread you have. This time, I had leftover french bread from serving slow cooker potato soup for dinner a couple of nights prior, so I used that. But regular sandwich bread works. In a pinch, crumbled crackers can work as well.
Add the bread pieces into the meat mixture and mix it all together well. You can use a spoon for this or your clean hands to do so. I think using your hands is easiest, but do what works for you.
The next step in this meatloaf recipe is putting the meat into a 9×13 baking dish. My mom’s tip is to make a bit of a “well” around the meat in between the meat and the pan. The grease will collect there and be easier to drain off.
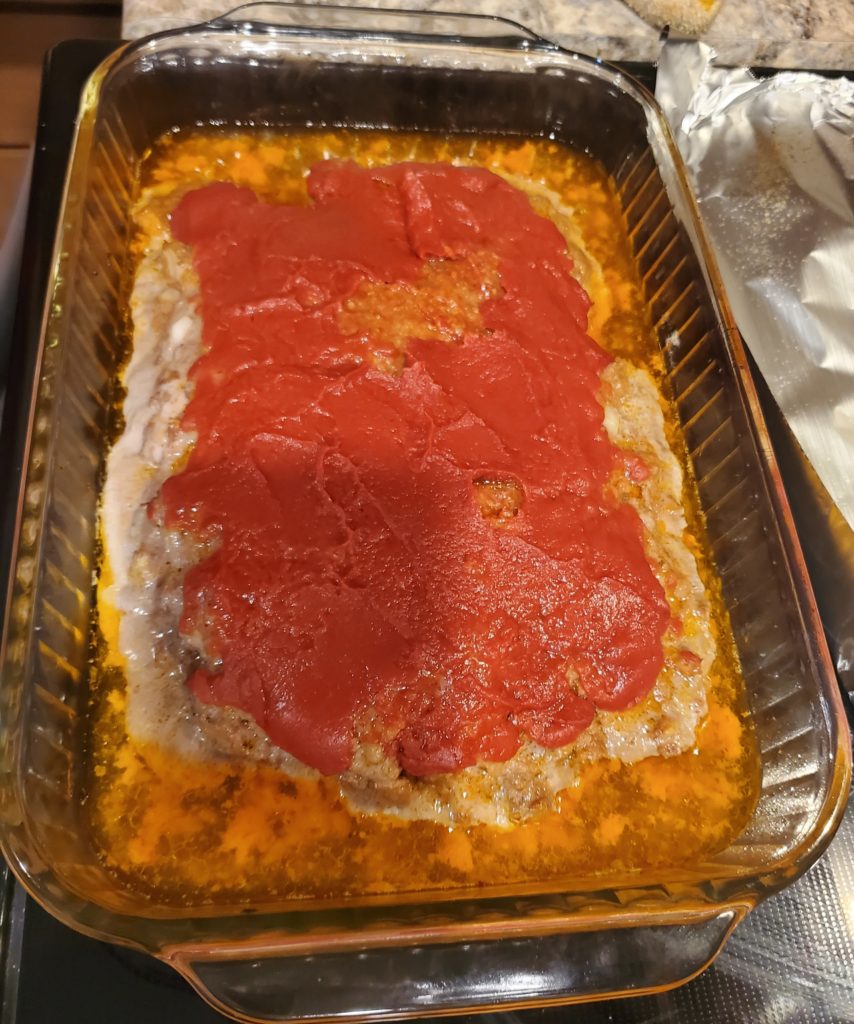
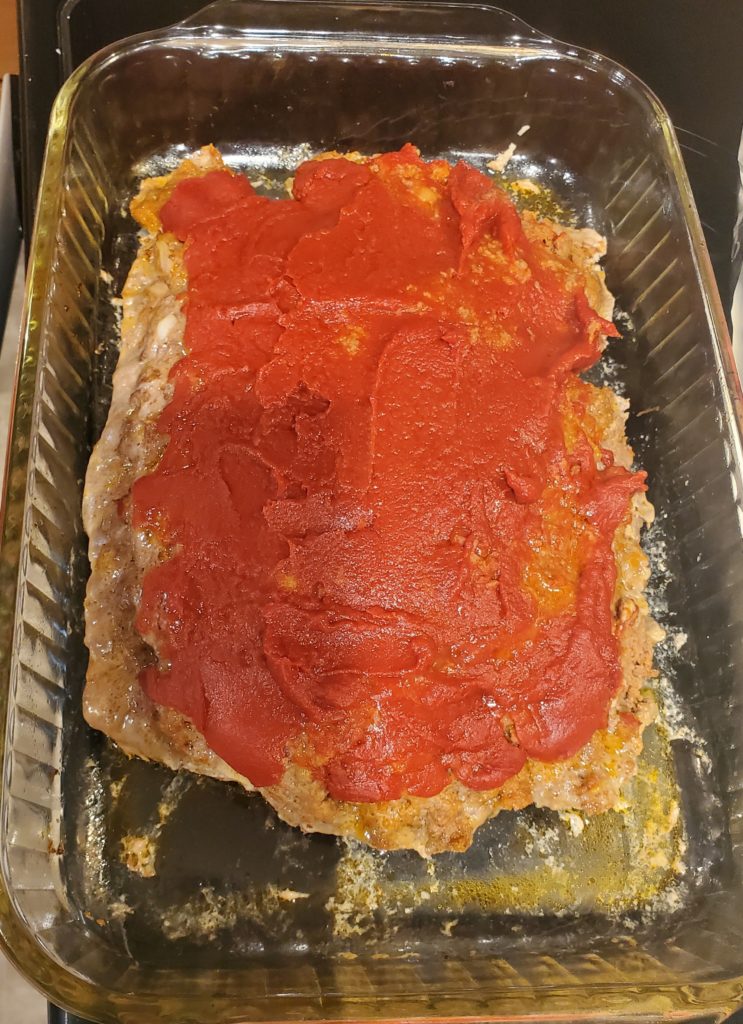
After your meatloaf is in the pan, top it with the 6 ounces of tomato paste. Cover the pan with aluminum foil and place the meatloaf in your preheated oven for 45 minutes.
Finish the meatloaf
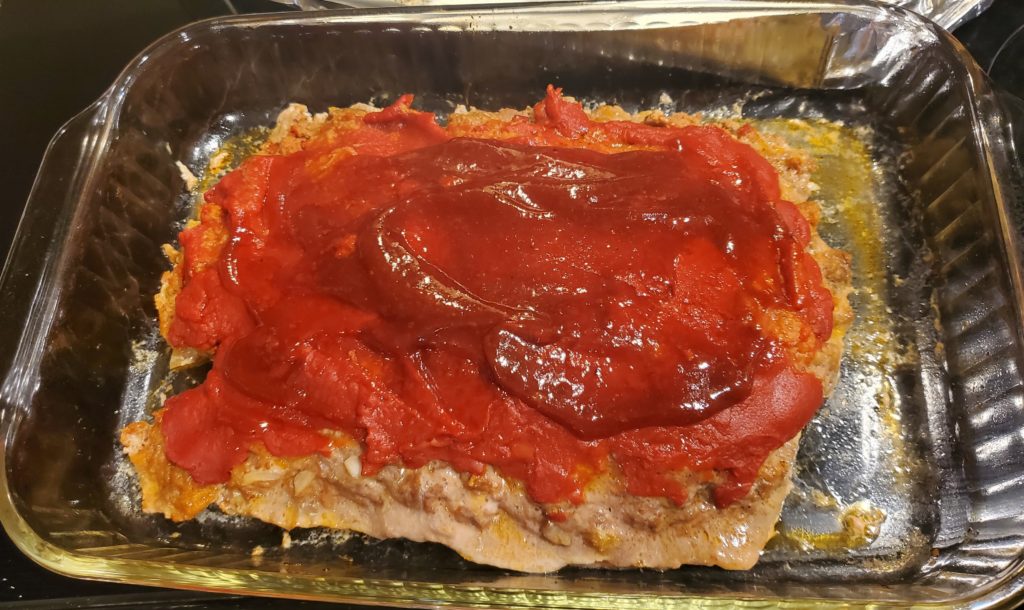
About five minutes before the 45-minute mark, mix up your glaze. The ketchup glaze in this meatloaf recipe is probably my favorite thing about it! Mix together 2 tablespoons of brown sugar, 2 tablespoons of ketchup and 2 tablespoons of honey barbeque sauce.
Pull the meatloaf out of the oven. The tomato paste will have baked into the top a bit and grease will have gathered around the sides.
If you want, an optional step for this meatloaf recipe is to drain off some of the grease. That’s what we chose to do. Here is what it looked like after we drained the grease.
Next, it’s time to spread the ketchup glaze over the meatloaf. Spread the mixed up glaze right on top of the tomato paste.
Put the meatloaf back into the oven, uncovered, for 15 more minutes. Let it set for about five minutes and then slice and put onto a plate for serving. (You want to move it to a plate to serve from because baking the second time will create more grease that you don’t want the meat sitting in.)
Put the ground beef and ground pork into a large mixing bowl. Add in the tomato sauce, bread, sage, egg and onion.
Add 3 tablespoons of ketchup and 3 tablespoons of barbeque sauce, and mix the ingredients well.
Put the meat mixture into a 9×13 baking dish. Flatten it out to the same thickness throughout and leave a small space between the sides of the dish and the meat.
Spread the tomato paste over the top of the meat. Then cover with aluminum foil and baked for 45 minutes.
About 5 minutes before the meatloaf is finished with the first round of baking, mix together 2 tablespoons brown sugar, 2 tablespoons ketchup and 2 tablespoons barbeque sauce to form the ketchup glaze.
Remove the meatloaf from the oven. If desired, drain some of the grease from the meatloaf. Then spread the glaze over the top of the tomato sauce.
Put the meatloaf back into the oven, uncovered, for an additional 15 minutes.
Remove the meatloaf from the oven and let it set for five minutes before slicing and transferring to another plate to serve.
Keyword family dinner, family recipe, ketchup glaze, kid friendly, meatloaf, traditional recipe
Ideas for mompreneurs to get started while welcoming a baby
I’m excited to share this blog post about how to start a new business as a new parent. Charlotte Walker of HomeSafetyHub.com has some great insights for mompreneurs to get started in a business or side hustle. Charlotte herself has been passionate about safety her whole life and enjoys writing about topics related to homes and home life.
When you make the decision to start or grow your family, you have so many exciting milestones to look forward to. At the same time, though, it can be a period of overwhelming responsibilities. To meet your evolving financial goals, you might come to the decision to start a new business. While doing so can make this period of your life even more turbulent, it is a challenge worth undertaking for the sake of your family’s well-being. By keeping a few helpful tips in mind along the way, you can lay a strong foundation of support that will help keep your new child happy and healthy for years to come.
Start with a great business plan
You can reduce the stress you place on yourself during this hectic time by having an actionable business plan that removes some of the uncertainty from the situation. A well-written plan outlines the goal of your business, as well as the processes you will follow to attain that goal and the funding options available to you.
Your business plan should also describe the structure you will choose for your enterprise. For example, you might decide to establish a limited liability company or LLC to protect yourself from potential litigation issues and excessive tax obligations.
Develop Marketing Strategies
In outlining a successful marketing plan as you start a new business, consider both long and short term goals, analyze current market trends, set a budget and define a target audience. You’ll want to identify what platforms you will use to reach potential customers and develop an argument that creates conversions by emphasizing the value of your product or service.
Content marketing entails creating and sharing meaningful content that resonates with the target audience of that business. With a well-thought-out strategy, an effective content marketing program can generate more leads and establish trust with potential customers while helping a new business develop its brand image. Content creation is essential when you start a new business.
Prioritize Work-Life Balance
Mental health experts claim that as many as one in four Americans feel the stresses of a poor work-life balance. The ability to strike this balance should be a given, not a luxury. As a parent welcoming a new baby, finding that work-life balance is a necessity for ensuring your family gets the attention they need.
The best way to find a healthy balance is by building out a schedule or routine that accounts for all of your responsibilities while also being sustainable for your own wellness. As another idea, consider setting up a space for your new baby close to your home office so you can respond quickly when parental action is required.
Invest in Comfortable Clothing
New moms need comfortable clothing that can easily transition from a busy day of running their new business, to feeding a baby and then to some much-needed rest and relaxation. Finding clothing that is both stylish and supportive isn’t always easy, but with the right combination of items it is definitely possible! Look for relaxed fits like ultra-soft T-shirts, tunic tops, easy pants, and drapey yoga sets that provide plenty of air ventilation and don’t cling in any areas.
Save Time With Efficient Business Practices
Using the best tools and methods available will help you cut down on your daily workload, giving you more time to spend with your family. Premium accounting software and other examples of cutting-edge tech may seem like unnecessary investments at first, but the amount of time and money you can save in the long run can make these solutions absolutely necessary.
Another way to save yourself some precious time is by implementing a thorough document management system. This is especially important if you need to share files with clients, employees or collaborators. Keep in mind that PDFs are often the preferred file format. A PDF converter will allow you to streamline your filing and recordkeeping by converting files that are in different formats.
Find Help When You Need It
If you find yourself in a situation where you simply cannot give your young children the attention they deserve, it may be time to seek outside help. Hiring a reputable babysitter or childcare service can give you peace of mind in knowing your child is safe and cared for at all times.
There are few things as fulfilling as starting a business or becoming a parent. Experiencing both at the same time can be uniquely challenging but also unparalleled in creating a sense of accomplishment. Write a business and marketing plan, purchase some comfortable clothing, prioritize work-life balance, learn about efficient business practices and find childcare help to become a successful mompreneur.
Looking for more resources to start a new business as a mom? Join me this year at the Monetizing Mompreneurs Summit!
When I think about whether I’d go back and tell my younger self anything if I could, sometimes I think I would. Other times, I think I wouldn’t.
After all, the life I’ve lived has formed me into who I am today. However, as my daughter is officially in the teen years, I have been thinking more of advice to my younger self.
These nuggets of wisdom garnered over four decades of life have been hard-earned and oftentimes hard-learned. I want to pass along words of wisdom as much as I can to my children.
I know they won’t always listen. Some lessons they’ll have to learn the hard way. And they’ll learn lessons that weren’t even relevant to me as a teen, especially as it relates to social media. As a xennial, social media wasn’t on the scene for me in middle or high school.
I also realize that neither of my children are replicas of me. I see parts of myself in both of them, but they are fully and uniquely their own people.
So in thinking of advice to my younger self, I stayed away from specifics. Instead, I came up with 10 main points I wish all tweens and teens could embrace and take in.
Affiliate links are used in this post, if you make a qualifying purchase via my link, I receive a small percentage of the sale at no additional cost to you. It helps support my blog, so thank you for your support! Read my full disclosure here.
1. Don’t take everything so personally.
Honestly, at the root of not taking everything so personally is more this message: Not everything is about you.
Here’s what I mean. If you have a friend who isn’t as talkative one day, chances are he or she probably isn’t mad at your. Most likely your friend is tired or having an otherwise off day.
If your mom snaps at your for something small, she is most likely just juggling multiple things or having a rough day. It doesn’t mean you’re awful.
I’ve always been incredibly good at taking things personally. I see the same attribute in one of my children, especially.
But really and truly I’ve learned at least 90% of the time, the action or words I take so personally don’t really have anything to do with me specifically.
I wish I would have learned that sooner. I could have saved myself a lot of grief and anxiety.
2. Learn to speak up for yourself.
It took me into adulthood to find my voice. And even now, I still struggle to speak up for myself. Advocating for yourself is important.
If someone is treating you poorly, speak up for yourself and let them know it’s not OK before it’s too late.
In fact, I had a friend I was close with through middle school and most of high school. She would often say hurtful things that I let slide. And then one day, I’d had enough. I decided we were done.
Our friendship ended (for this and other reasons) when it might not have had I spoken up for myself and worked out the issues sooner.
Being a people pleaser never leads anywhere good. You can’t make everyone happy all the time.
Don’t be afraid to respectfully speak up for yourself and your needs.
And remember nobody can read your mind. If you have an issue with someone, talk to them plainly instead of passive aggressively.
3. Know you’ll find your people.
Some people make lifelong friends early on in life. My husband, for example, has a great friend who he met in fifth grade, and they have been friends ever since.
But not all of us are those kind of people. When it comes to friend “luck,” in fact, I’ve struck out more often than not. If I were to give advice to my younger self, I’d tell her to hang in there.
During the tween and teens years, you’re mostly just with the kids you know from school. Maybe you’ve found your people during these years — and that’s awesome.
But maybe you haven’t. Or maybe they are sort of your people but not quite. Know you will eventually find your people who “get” you and accept you for who you are.
As you get older and into college and work, you’ll meet more people. Some will be part of your life for a season; others will remain for a lifetime.
Don’t worry if you’ve not found your lifetime friends, yet. You still have plenty of time.
4. Stick with friends who stand by you.
Friendships are constantly shifting and changing when we’re in middle and high school. I have a plethora of stories just from my own middle and high school days! But, if you find a friend who sticks with you during hard times, keep them.
I will never forget the day in my senior year of high school when a group of “friends” spent the entire lunchtime talking negatively about me. One of my friends got up and left the table. She didn’t engage in the conversation and came to find me instead. She gave me support and encouragement.
To this day, she is still one of the only people from high school I see on a regular basis. When you identify your true friends, hang on tight.
5. Ignore other people’s opinions of you.
During middle and high school, I was very aware of other people’s opinions of me. I think that’s pretty normal. But sometimes we need to just ignore what other people think and live our lives.
Don’t be so busy worrying about what other people think of you that you let it shape the decisions you make. I know that can be easier said than done. I wish I would have learned sooner to not care about other’s opinions too much, though.
A great piece of advice I see floating around online is to not take criticism from people who you wouldn’t go to for advice.
6. Remember everyone has a story and a struggle.
To some degree, I think we all are aware everyone has more going on than we know about. Yet, we can easily forget that in the midst of dealing with our own challenges.
In giving advice to my younger self, I’d remind her she doesn’t know everyone’s story. Some people need more grace than anyone gives them. Some people need to be loved. Others need someone to call them on their actions.
Remember if you’re going through a difficult time, it doesn’t mean your friends aren’t. We can be very good at acting like everything is fine when it isn’t.
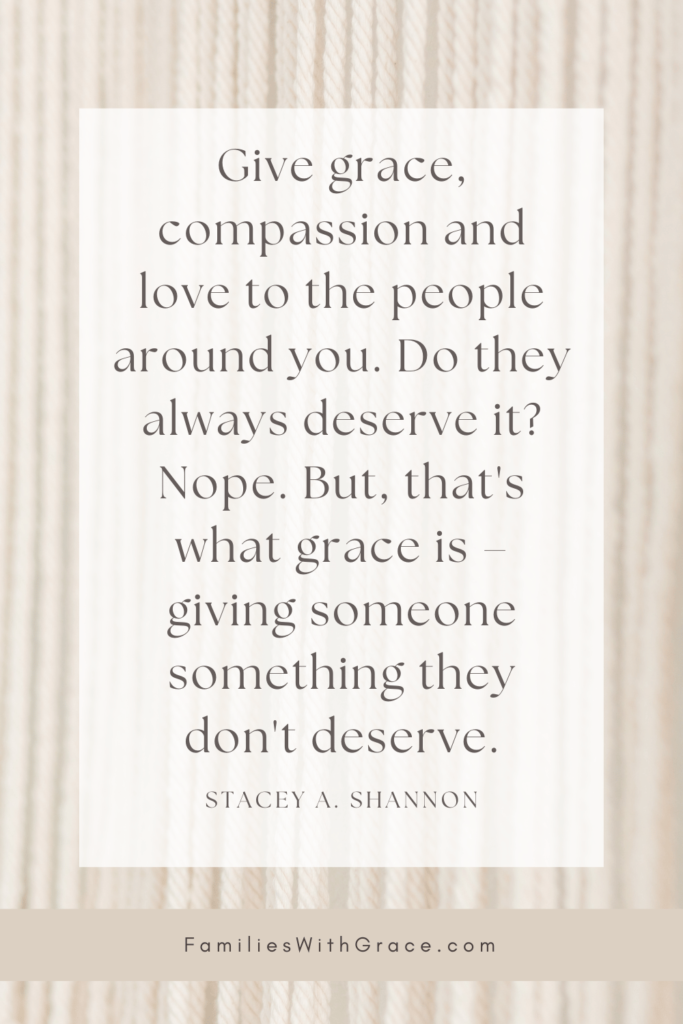
Sometimes the people who seem the happiest and most bubbly at school are the ones who cry themselves to sleep each night. Give grace, compassion and love to the people around you. Do they always deserve it? Nope. But, that’s what grace is – giving someone something they don’t deserve.
7. Don’t be so stressed about academics.
Growing up, I put so much pressure on myself to do well in school. I have theories about why I did this, but they don’t matter.
What I’ve learned is nobody in my life as an adult cares what my high school GPA was. Did having a great GPA help me land a full scholarship to college? Absolutely. But, did I need to stress as much as I did over it? Definitely not.
My advice to my younger self would be to just let it go sometimes. To do well, do her best and get good grades, but don’t make that such an important part of life.
I completely missed my 16th birthday because I had a band concert that night. My band director threatened to dock my grade to a “C” if I didn’t go to the concert.
So instead of celebrating with my family as planned (and as I wanted to), I went to the concert. I didn’t want to risk my GPA. Looking back, I should have just stayed home and celebrated. And that leads to…
8. Relax and enjoy life.
I know life seems stressful and busy when you’re a tween and teen. I do remember that, but I can also promise you are in a phase when you can choose to just enjoy life.
You have some responsibilities, sure. However, you aren’t in charge of everything in your life. While that is sometimes frustrating, it’s also freeing.
Middle and high school are the perfect times to enjoy life. Try new things. Take up a new hobby and see what you think. Spend a Saturday reading through an entire novel.
Don’t get so caught up in the stress of life that you forget to also enjoy it!
9. Life will never go according to plan.
Poor younger me. She was a planner. In fact, I still am a planner. I love to have a plan and to-do lists. They make my heart sing.
But my best advice to my younger self is to know that life won’t go according to plan, and that’s OK. Your tween and teen years are a great time to learn to embrace the unpredictability of life. Get upset about the change in what you had planned if you need to.
However, don’t get stuck there. Move forward into a plan B, C, D or however many letters it takes!
One day, you’ll look back and understand why your original plan not working out was for the best. Or at the very least, you’ll see lessons you learned as a result.
And more times than you would guess, you’ll be thankful your original plan fell through because the alternative was so much better. Make plans, but know they won’t always turn out exactly as you envisioned, and it really is OK.
10. Give yourself grace.
Yep. I do harp on this a lot, but it’s something I wish my younger self knew sooner. I’ve spent a lifetime excelling at being hard on myself. I’m nice to people around me. In fact, I love encouraging other people and always have, even as a tween and teen.
But, whew! I am mean to myself. My inner voice says awful things and has no patience for mistakes.
I’m continually learning to quiet this voice and remind myself I’m doing the best I can. I truly wish I had learned this lesson from a younger age. It would have saved me from so many negative feelings and given me self-confidence.
A delicious cookie dough dessert without any raw eggs
I love chocolate. A lot. A super lot. My favorite cookies are chocolate chip cookies. And I definitely enjoy some chocolate chip cookie dough when I’m baking them.
But, I don’t eat it otherwise, because the risk of salmonella. My son loves chocolate chip cookie dough ice cream. So when I discovered an easy recipe for edible chocolate chip cookie dough, I knew I had to try it.
I first made it in 2020 when we were spending lots of time at home thanks to COVID-19. Since then, I’ve made this edible chocolate chip cookie dough multiple times and learned a few things along the way.
The first being that I need to double the recipe. Making just the amount for the original recipe isn’t nearly enough for my family!
I’ve made a couple of other tweaks to the recipe and it’s the absolute best. I just made a couple of batches for my son’s 10th birthday and knew I had to share the recipe for this edible chocolate chip cookie dough. I can’t keep the deliciousness to myself!
Prepare the flour
My concern in eating raw chocolate chip cookie dough used to be just the salmonella in the eggs. However, I’ve more recently learned raw flour also poses a risk.
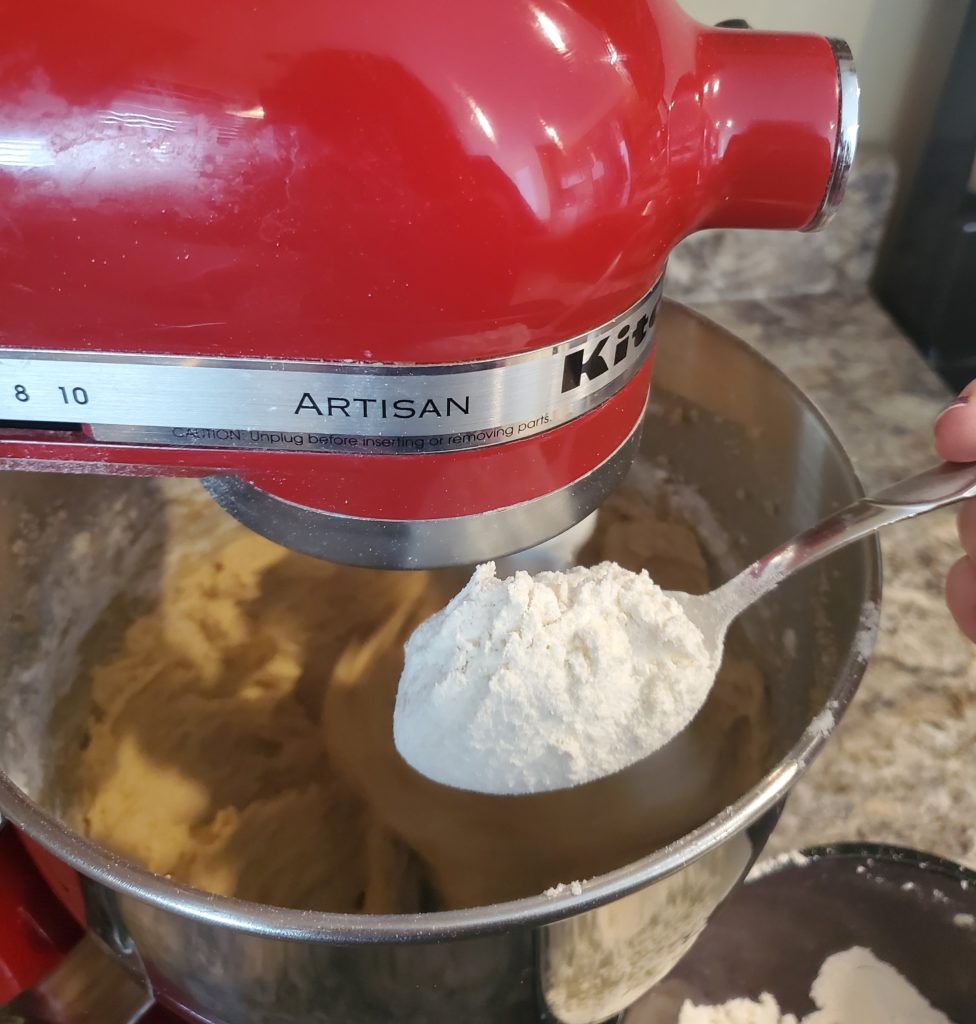
The good news is that you can do this easily in your microwave. Pour two cups of all-purpose flour into a microwave-safe bowl and microwave in 30-second increments, stirring after each 30 seconds, until the flour reaches 165-degrees (F). My microwave usually does this in two run-throughs.
I grab my kitchen thermometer and really do measure the temperature for this process to be sure. If you don’t have a kitchen thermometer, then just heat the flour for at least 1 minute in 30-second increments.
Mixing the cookie dough
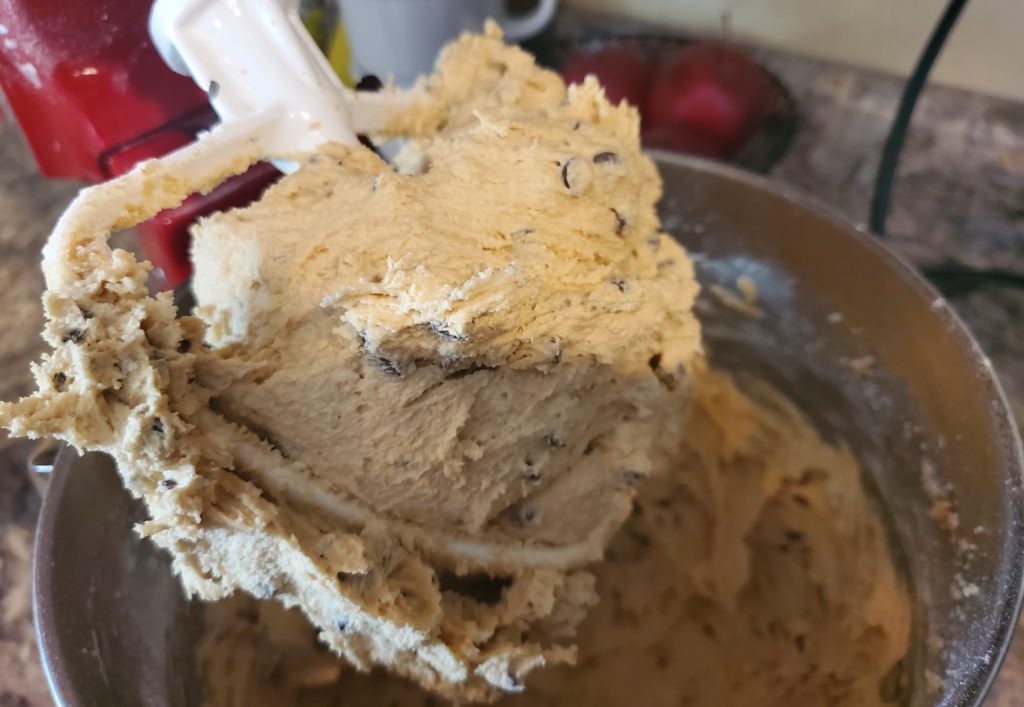
Once your flour is all prepped and ready to go, you just need to mix together all the ingredients. I use my beloved stand mixer, Dorothy, for making this edible chocolate chip cookie dough, but you can also use a hand mixer or spoon.
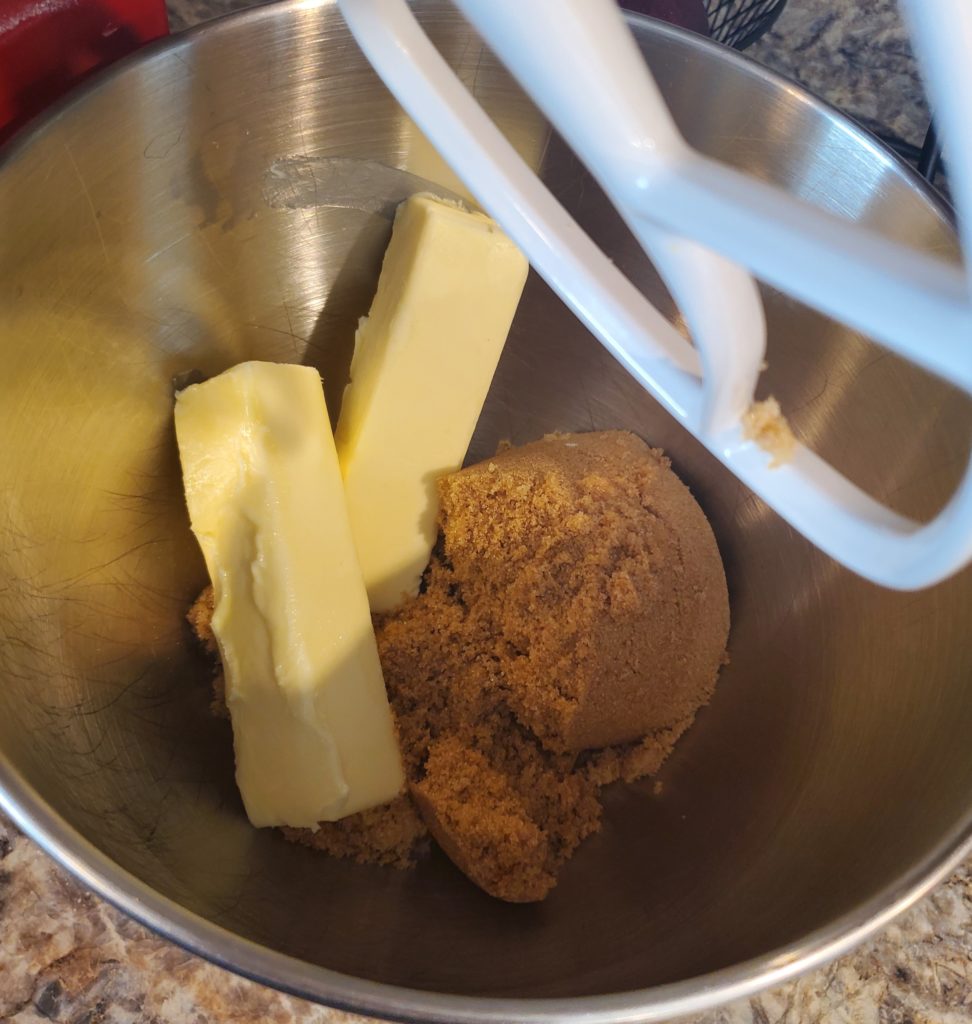
Put your prepared flour to the side and beat the 2 sticks of room temperature butter with 2 cups of packed brown sugar.
You’ll know it’s creamed when it is thoroughly combined and fluffy.
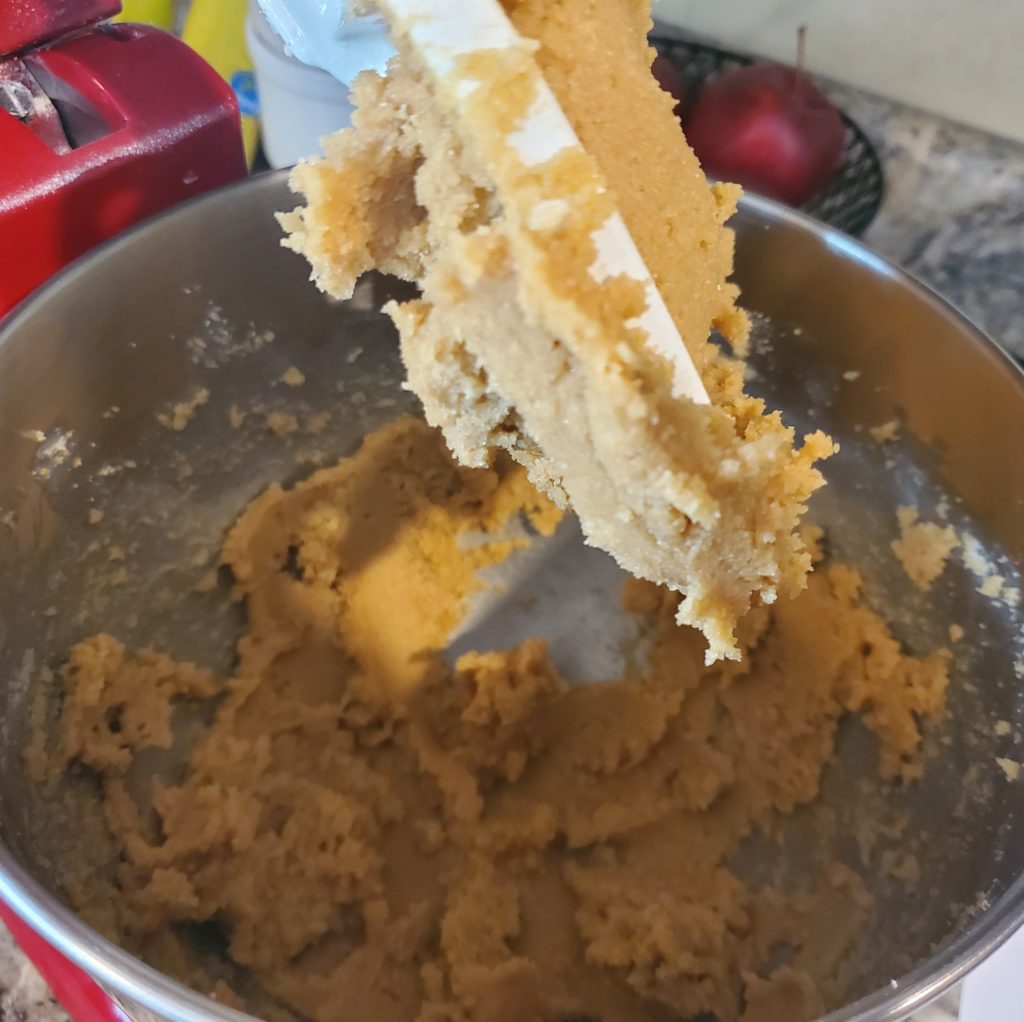
Next, add in 1/4 cup milk, 2 teaspoons vanilla extract and 1 teaspoon of salt. Mix the ingredients together. (Be sure to slow down your mixer before adding in the wet ingredients to avoid getting splashed by them. Yes, I speak from experience!)
The mixture should be thick, but still wet and clumpy.
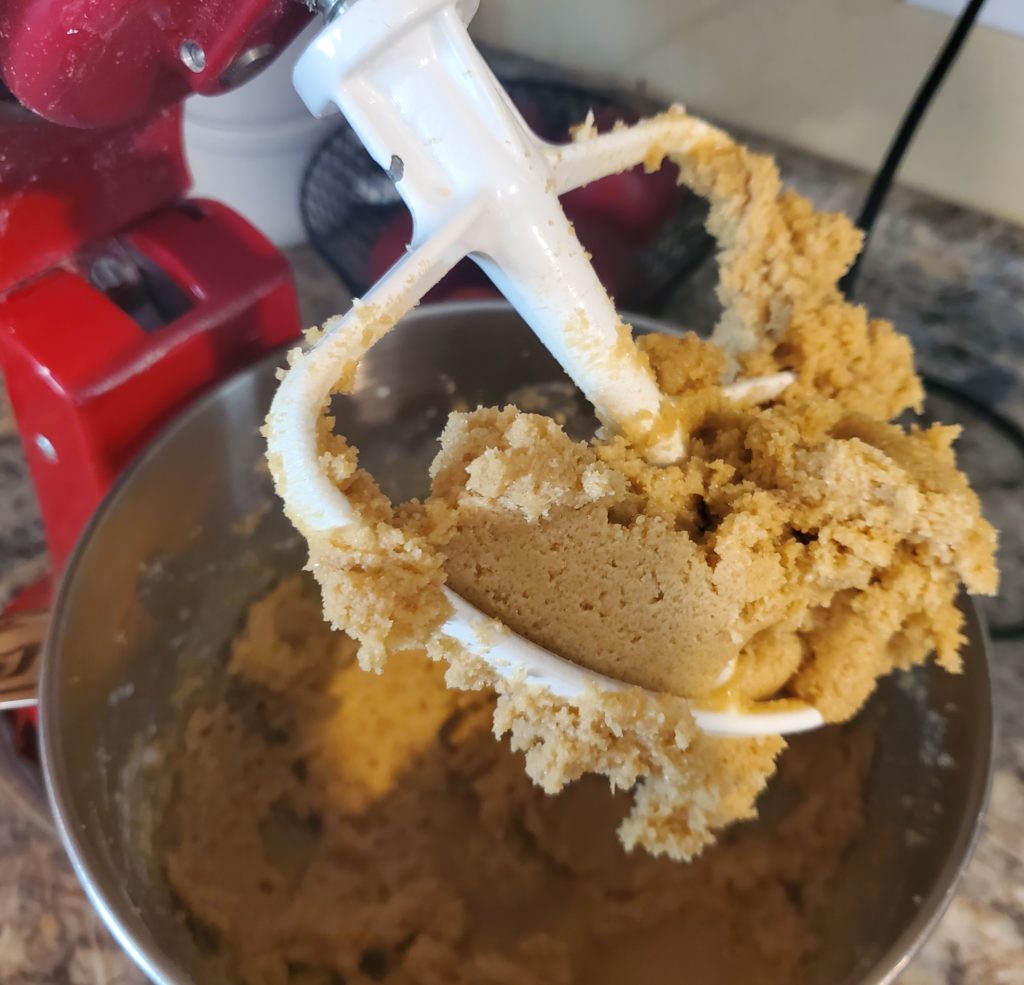
Now you’re ready to put treated flour to work. Mix it into the mixture in stages. I usually put it in with a heaping tablespoon at a time.
Once the flour is all mixed in, you should have the consistency of chocolate chip cookie dough that is thick and soft.
Finally, it’s time to stir in the chocolate chips. You could use full-sized semi-sweet chocolate chips for this recipe, but the mini ones work better and are easier to eat.
I use my stand mixer’s “stir” setting to stir in the chocolate chips, but you could also do it by hand. You want to avoid a higher setting that will break up the chips.
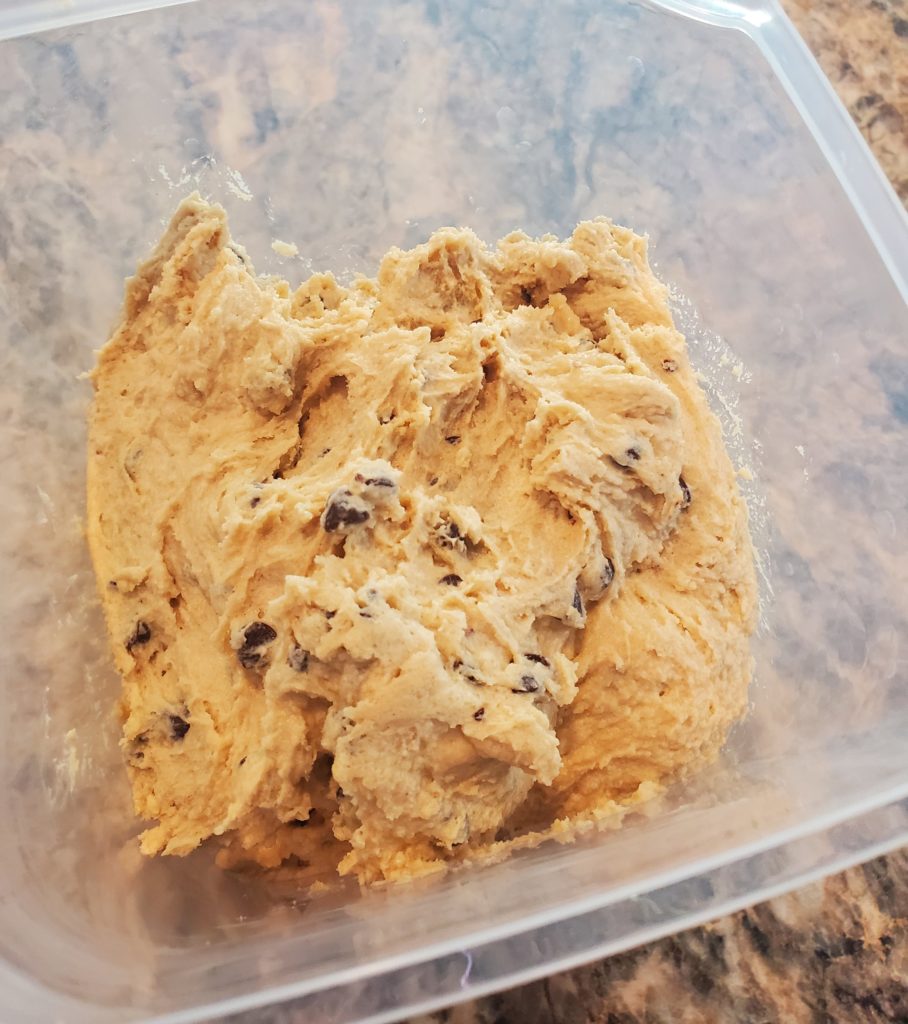
Transfer the edible chocolate chip cookie dough into an airtight container and store it in the refrigerator. I can’t tell you how many days it lasts in the fridge beyond two or three, because my family doesn’t keep it around for long!
Serve it by itself, alongside fudgy brownies, with ice cream or however you think sounds best!
Edible Chocolate Chip Cookie Dough
This edible chocolate chip cookie dough recipe is delicious and easy. Eat it by the spoonful, with ice cream or with any other dessert!
Heat treat the flour to kill any bacteria contained in it by placing it in a microwave-safe bowl and "cooking" it in the microwave for 30 seconds at a time, stirring between each 30 seconds, until the temperature throughout reaches 165-degrees (F). Set the flour aside.
In a stand mixer or using a handheld mixer, add the butter and brown sugar. Beat together until well combined and fluffy.
Turn the speed down and add in the milk, vanilla and salt. Mix until combined.
Slowly add in the heat-treated flour at low to medium speed until it is well mixed into a soft, thick "dough."
Stir in the chocolate chips.
Put the edible chocolate chip cookie dough into an airtight container and store in the refrigerator. Enjoy!
I was slow to the legging trend. It took a couple of years after leggings became popular for me to really get into the groove of wearing them. Now they’re pretty much all I wear and work for casual and dressy times. But, as a mom who is also fluffy, I’m all about having the right top to go with it. Sometimes finding the best tunic tops for moms can be difficult, but lately I’m coming across all kinds of them.
While I’ve found tunic topics in a variety of places, my favorite place to find them is on Amazon. Most stores offer free returns that I can drop off unpackaged at my local UPS store if something doesn’t work. I love tunic tops that are comfortable to wear and comfortably long.
I also refuse to spend more than $30 on a tunic top to wear with leggings, because I’d rather spend the money on my kids or something else. So, I’ve pulled together some of the best tunic tops for moms that are under $30. I have most of these tunic tops myself and love the way they fit, feel and cover. Even better, none of them need special washing or get super wrinkly.
(And if you don’t like the color or designed shown, rest assured that all of them come in various designs and/or colors! Many of the styles come in both long and short sleeves as well.)
Affiliate links are used in this post, if you make a qualifying purchase via my link, I receive a small percentage of the sale at no additional cost to you. It helps support my blog, so thank you for your support! Read my full disclosure here.
Long-sleeved tunic tops for moms
Short-sleeved tunic tops for moms
This is one my all-time favorite tunic tops! I have it in multiple colors.
Looking for leggings to wear with your tunic tops? Check out these leggings my daughter and I love. They fit well, feel great and wash up well!
Baked hot dogs have a fresh-from-the-grill flavor any time of year!
Affiliate links are used in this post, if you make a qualifying purchase via my link, I receive a small percentage of the sale at no additional cost to you. I only recommend products and services I use and love. It helps support my blog, so thank you for your support! Read my full disclosure here.
The first year my husband and I were married, he told me he liked hot dogs. Since he’s a relatively picky eater and I was a relatively awful cook, I made hot dogs. A lot. As a result, the guy won’t eat boiled or microwaved hot dogs any more.
As a Midwestern resident, I decided to look for a winter-friendly way to get a grilled hot dog taste that didn’t involve anyone standing out in the cold at the grill. I decided to try baked hot dogs and was pleasantly surprised. Even my husband agreed that baked hot dogs were nearly as good as grilled.
Picking the hot dogs
When it comes to hot dogs, my husband prefers what I call “old school” dogs. We skip the specialty or all-beef hot dogs. Bun length dogs don’t even have a place in our home. And forget the extra thick guys. So, we get regular length, skinny dogs. That’s all I’ve tried baking in the oven. If you are baking thicker or longer hot dogs, you may have to have a longer baking time. Just beware of that.
Let’s get baking!
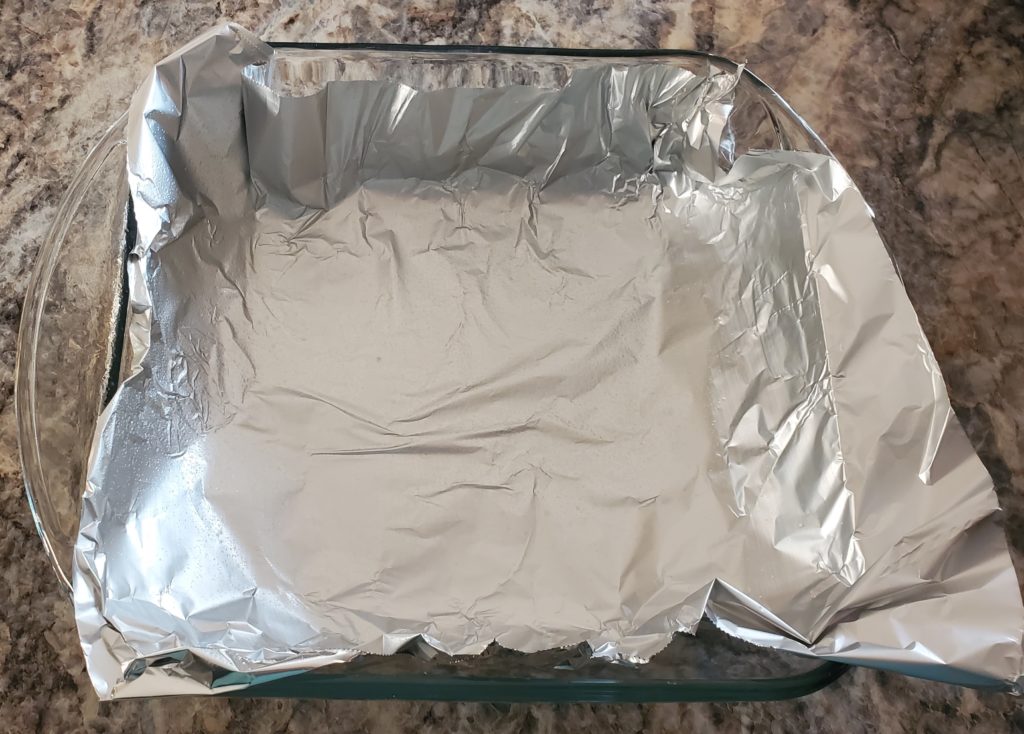
This is an incredibly simple and straightforward recipe. Start by preheating the oven to 400-degrees (F). Line a baking dish with aluminum foil. I spritz mine very lightly with non-stick cooking spray, but I’m not sure that’s necessary.
Next, just put the hot dogs into the pan in one layer. (How simple is that?!)
Pop the hot dogs into your preheated oven. They baked for 15 minutes total. (Maybe more if they are thicker.) I usually set my time for 7 minutes and shake the baked hot dogs around halfway through. If you really want crispy or blackened hot dogs, you can broil them for the final couple minutes of baking time to the correct doneness. We like ours to be cooked with a bit of crisp on the outside but not color.
And that’s it. I told you this was a simple recipe! Serve the hot dogs in buns with your favorite toppings. The baked hot dogs pair well with this super easy fire-roasted corn and red peppers. If you’re looking for a crunchy side, try this skillet queso with tortilla chips. And whip up some mint chocolate chip mousse for a simple and refreshing dessert!
Baked hot dogs
Nothing beats a good grilled hot dog, unless it's freezing outside! This baked hot dog recipe is super simple and just as tasty as grilled!
Line a baking dish with aluminum foil. (The size of the dish depends on how many hot dogs you're making. You need enough space for them to be in a single layer.) Spritz lightly with non-stick cooking spray.
Arrange the hot dogs in a single layer on top of the foil.
Bake in the preheated oven for 15 minutes or until cooked through and golden. To add extra crispness or darkness, broil on low for the final 2 to 3 minutes of cooking time.
Serve with your favorite hot dog toppings!
Keyword baked hot dog, easy dinner, family dinner, grilled hot dog, Hot dog, Hot dogs, kid friendly, weeknight dinner
Thanks to Sarah Bull from EconomyMom.com for sharing this guest post about becoming a mompreneur with Families with Grace! Sarah is a single mom of two, an entrepreneur and a penny pincher. She created her blog to share what she’s learned about growing a home-based business and making money online all while raising two awesome kids. Through her site, she hopes to inspire readers, especially fellow moms, to take their earning destinies into their own hands using her career and money-making advice. Be prepared to be inspired!
As a stay-at-home mom, you might not work a nine-to-five, but you certainly spend the day working. Household chores and childcare are enough to fill your time, but perhaps you have an entrepreneurial itch and you want to start your own business. If you aspire to join the ranks of successful mompreneurs,these six essential skills can help you succeed.
1. Business initiative
The most important skill of all is a sense of initiative. Even if you have a stellar business idea and a fully fleshed-out plan, you’re the only person who can make that plan a reality. Mompreneurs need to have the confidence and determination to start your business — and keep it going when challenges inevitably arise.
2. Ability to plan ahead
Planning ahead is another vital skill that entrepreneurs — and parents — must have, and you can plan ahead for your business by starting a limited liability company. An LLC can minimize the amount of taxes that you owe and protect your personal assets, and it may also reduce the volume of paperwork you have to complete.
Another great way to plan for your business’s future is by going back to school for a degree in Information Technology. And if you’re open to online learning platforms, you should consider this option which allows you to learn at your own pace as well as gain skills like networking and data management that are vital to modern businesses.
3. Knowledge of digital records
Successful mompreneurs need to know how to run a business efficiently — and maintaining digital records is a huge part of that. Digitizing paper files will save space, and it also allows you to save documents on your tablet or phone in a PDF format.
Keep important documents readily available when you’re on the go. PDFs are great because they can be accessed on a mobile device even if you can’t connect to WiFi. They’re also great for sharing documents without worrying about editing permissions.
4. Social media marketing savvy
Social media is a vital tool for connecting with your target customers and marketing to them directly. In order to take advantage of this potential, you need to learn how social media algorithms work. You also need an eye for aesthetics if you plan on creating marketing graphics to use on social media.
According to statistics, members of Facebook spend an average of 19.6 hours on the site each month. Using a Facebook ad maker can simplify the process of marketing to these users. It’s easy to edit a template with your own photos, fonts and other details. Download it immediately once your design is done.
5. Marketing smarts
Social media isn’t the only marketing tool you need to master. You should also familiarize yourself with local print advertising opportunities and other marketing channels that may be effective.
6. Balance between work and kids
Achieving work-life balance is a skill some people spend their whole life chasing. If you plan to be a stay-at-home mom and a small business owner, though, you need to master it sooner rather than later. You can start by clearly designating your time and splitting it between your business and your kids.
Moms make great business owners
Moms are some of the hardest-working people on the planet. If you’re ready to start making a profit from your work, starting a business could be the right path. Your business will benefit from forming an LLC, going back to school and devising a solid social media marketing scheme. Being a mompreneur can be your path to the successful work-life balance you want.
Families With Grace invites you to join in the journey to create a home filled with grace, love and faith. Questions? We’d love to hear from you!
7 Simple & effective ways to keep your family focused on Jesus
From the beginning of our parenthood journey, my husband and I have worked to share our faith with our children. And Christmas is an important season for Christianity.
We want our children to enjoy the fun of Christmas, but we also want them to understand what and Who we are ultimately celebrating.
Throughout the past 13 years, we’ve come up with a few ways to keep Christ in Christmas that are both simple and effective.
Affiliate links are used in this post, if you make a qualifying purchase via my link, I receive a small percentage of the sale at no additional cost to you. It helps support my blog, so thank you for your support! Read my full disclosure here.
1. Read a Christmas devotion book together throughout December.
When my daughter was a preschooler, our church passed out free family devotions for Advent. It wasn’t something we had done as a family before, but we decided to give it a try. On the first night we did so, our daughter cheered.
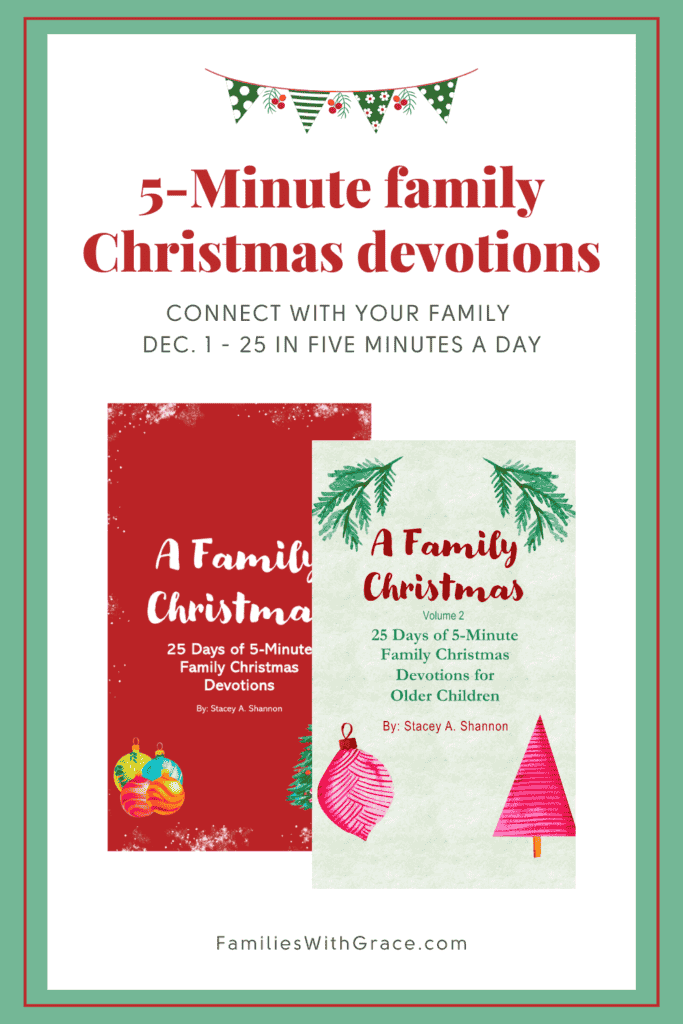
Family Christmas devotion time during December has worked its way into our routine. When we had some trouble finding devotion books that we really enjoyed, were age appropriate and didn’t take a super long time, I decided to put together my own. I now have two versions of “A Family Christmas: 25 Days of 5-Minute Family Christmas Devotions.”Volume one is for younger children (preschool through early elementary), and volume two is geared toward tweens and teens. My kids are 9 and 13, so we are using volume two again this year.
Reading through the Christmas devotion book together takes us through the Christmas story and gets us talking about how it can apply to our lives today. Just a few minutes each evening makes a big difference to help our family keep Christ in Christmas.
Our family believes in Santa Claus and uses a visiting Elf in a positive way. But we also incorporate Jesus into those traditions. For example, Santa Claus leaves a letter for the children each year to find on Christmas morning. And he always mentions the importance of remembering the real meaning of Christmas. The Elf also reminds them in different ways to keep Jesus the focus of Christmas as well.
Both Santa and the Elf compliment our kids for kind things they do and how they keep Christ in Christmas. It’s a simple way to help tie the more secular traditions with our faith.
3. Read the Christmas story together.
When our kids were little, we found the best way to read the Christmas story together was one verse or so at a time. In fact, you can find a free printable version of Bible verses for Dec. 1 through 25 in this post. We would usually print the verses, cut them apart and then number and attach a verse to each of the Christmas books we wrap for our kids to open throughout December.
One of the bonuses of doing one verse at a time is that each evening, we would ask the kids what happened previously in the Christmas story. That helps ingrain the story firmly in their minds. In fact, even now with using the devotion book, we still do this since its verses lead us through the Christmas story as well.
4. Talk about the true meaning of Christmas.
You don’t have to give your children sermons or lectures about the true meaning of Christmas. But mention it in small ways when it comes up. For example, we have watched Christmas movies or shows as a family when the characters reference the real meaning of Christmas being time with family or something. We will ask our children what the actual true meaning of Christmas is. Or we mention the other stuff is great, but Jesus’ birth is the true meaning.
Our children are exposed to secular culture in a variety of ways. I like finding ways to help them learn how to navigate the world around them within their faith view. And this is something that works well at Christmastime.
5. Set up a nativity scene.
Whether you use a toy nativity scene or a decorative one, a nativity scene at Christmas helps your family keep Christ in Christmas. We’ve never had a toy one. Instead, I have the one my family had when I was a child as well as one from my maternal grandmother. We set up one downstairs and one upstairs.
My kids love setting up the nativity scenes. We’ve had many years of having a nativity scene that doesn’t look like I necessarily envision, but I don’t mind. What I have really enjoyed is hearing the kids as they were younger playing with the nativity scene as they moved it around. Learning about Jesus’ birth definitely doesn’t have to be all serious!
6. Listen to Christian Christmas music.
Music is a big part of my life and my worship. So listening to Christian Christmas music just fits right in. But, I will be honest in saying that I don’t usually enjoy the Christmas music played on contemporary Christian stations. It tends to all be slow and emotional. So, I have my own playlists. And some secular artists have their own renditions of Christmas carols talking about the birth of Jesus.
Our family doesn’t listen to only Christian Christmas music, but it definitely is part of our December. I always kick off the Christmas music season with my favorite Christmas album by 4Him, “A Season of Love,” that was released way back in 1997.
7. Read faith-centered Christmas books.
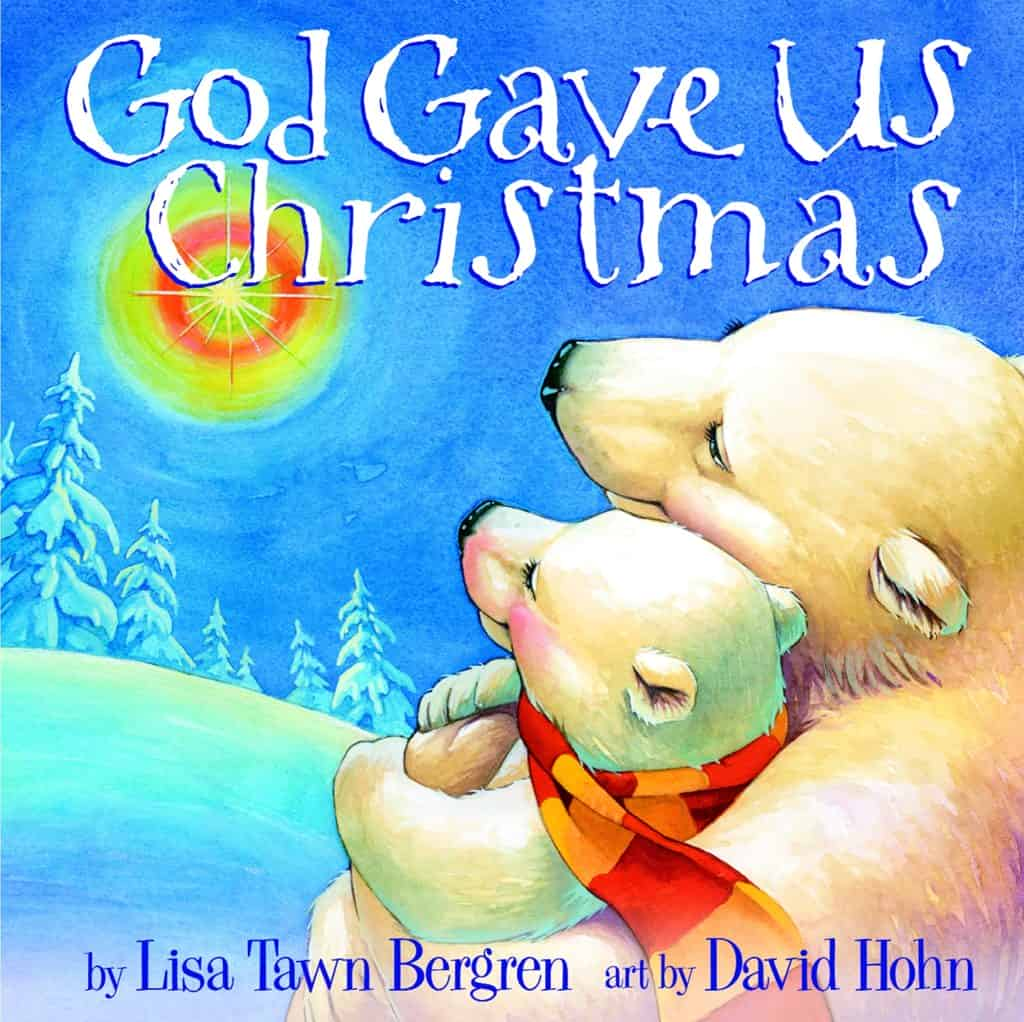
One of our family’s Christmas traditions is opening a Christmas book each evening Dec. 1 through 24. We have a wide array of books from traditional secular Christmas stories to silly ones to faith-based ones. We enjoy “The Animals’ Christmas Eve,” which tells the story of Jesus’ birth from the animals in the manger. Another great one is “God Gave Us Christmas” from Lisa Tawn Bergren. (I love the entire “God Gave Us” series from her!)
When it comes to making dinner, I love easy recipes. And super simple sides that work in veggies are the best! I found a recipe for fire-roasted corn and red pepper salad that I decided to try without looking too closely. When I realized it was intended to be served cold, I decided to change it up and make it my own way. That’s how this fire-roasted corn and red peppers side dish was born.
It’s nearly as easy as oven roasted vegetables and certainly as tasty. It comes together in about 10 minutes and doesn’t take much babysitting, which leaves you free to make other things while the fire-roasted corn and red peppers are cooking. The last time I made this recipe, I paired it with grilled barbeque chicken for a delicious dinner.
Prepping
The prep work for this fire-roasted corn and red peppers dish is minimal. Start by opening a can of whole kernel fire-roasted corn and draining it. This is what I used:
Then clean and dice one red bell pepper.
Cut 2 tablespoons of butter and separate them. Put a medium skillet on the stove over medium-high heat.
Cooking
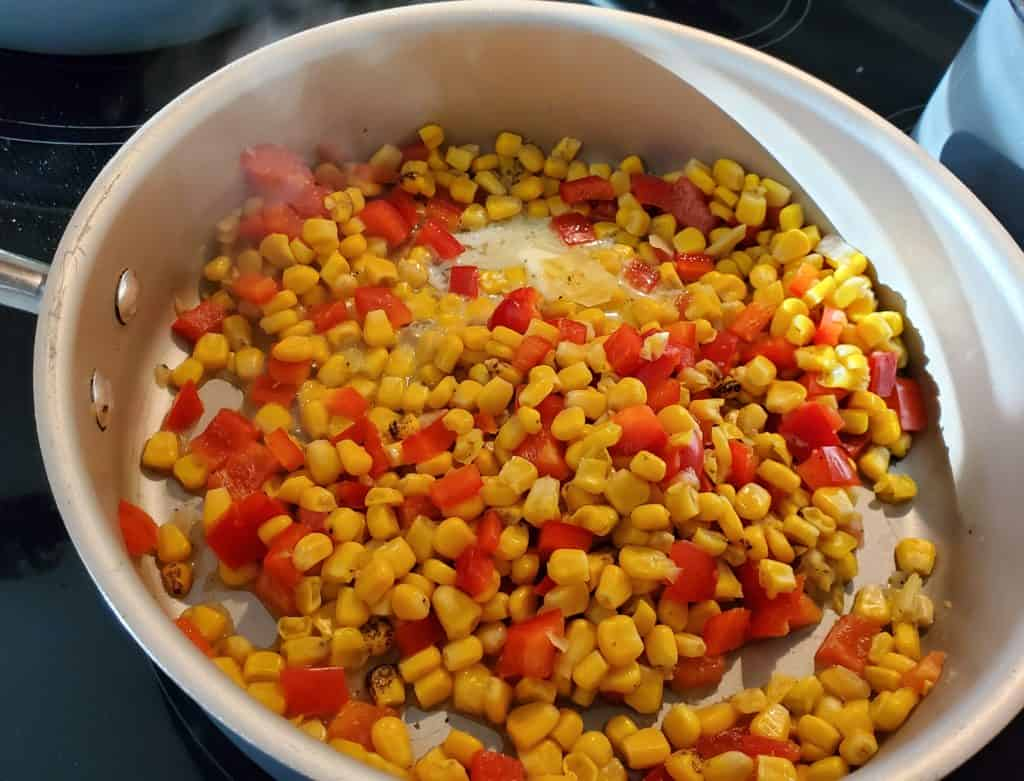
Put the drained fire-roasted corn and 1 tablespoon of butter into the skillet.
Cook for 3 to 5 minutes until the butter is melted and the corn is heated. Add in the diced red bell pepper, 1 additional tablespoon of butter and salt and pepper to taste.
Continue cooking for 5 to 7 minutes until the red pepper pieces have begun to soften. Serve the fire-roasted corn and red peppers side warm.
Fire-roasted corn and red peppers
This fire-roasted corn and red peppers recipe is a super simple side that pairs well with so many main dishes. It's a perfect family dinner side!
In a medium skillet over medium-high heat, add the corn and 1 tablespoon of butter. Cook for about 3 minutes until heated through and the butter is melted.
Add the diced pepper and 1 more tablespoon of butter to the skillet. Season with salt and pepper to taste.
Cook for 5 to 7 minutes until the pepper begins to soften. Serve warm, and refrigerate any leftovers.
Keyword canned corn, corn, easy side, family friendly, fire-roasted corn, kid friendly, red bell pepper, red pepper, simple side, vegetables