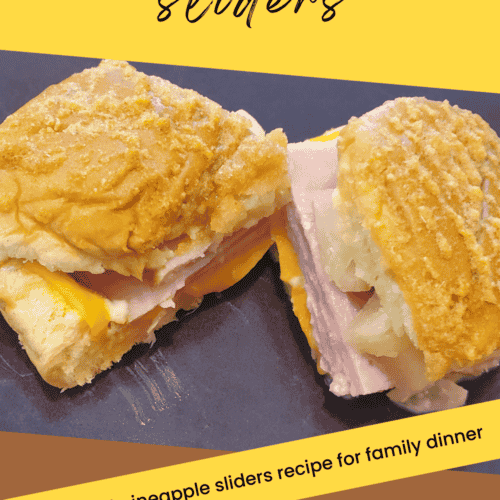
A ham and pineapple sliders recipe for family dinner
Easy-peasy recipes are my favorite and this ham and pineapple sliders recipe is definitely one of them. These work well for family dinner or a carry-in. You can easily double (or triple) the recipe to feed a crowd. And it’s a great way to put leftover ham to use after holidays. Basically, it’s super versatile!
Another great thing about these ham and pineapple sliders is that because of the way they’re made, you can also easily make a second type of slider if you have family members who don’t eat ham. Stay tuned to next week’s blog post for the pizza sliders I make for my guys whenever I make this recipe.
Putting together the sliders
Get started by preheating your oven to 350-degrees and spraying a 9×13-inch baking dish with non-stick cooking spray.
Next up, you need to prepare your slider buns. You can totally buy slider buns, but I prefer Hawaiian dinner rolls since they are a bit sweeter. I just slice them in half to make them into buns. Place the bottom half of the buns into the baking pan. I used one package of 12 rolls and divided them into two sides when I was making this recipe this time because I was using half of the rolls for the pizza sliders that will be up next week.
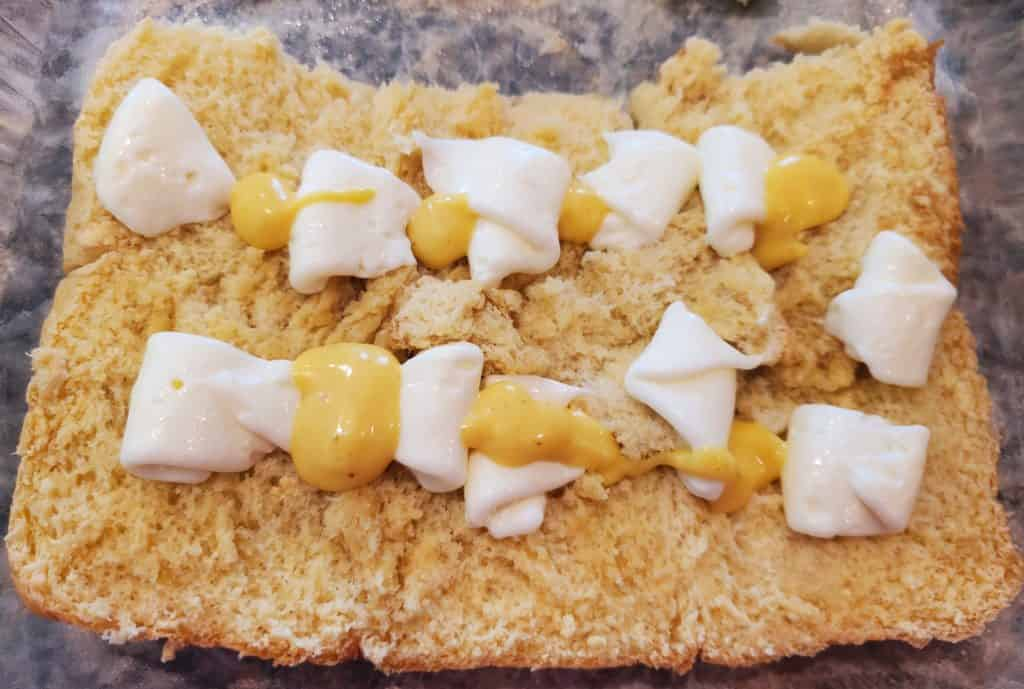
Once your bun bottoms are in the pan, dollop mayonnaise onto the buns and then a bit of honey mustard as well. Technically use about 1/2 tablespoon of mayonnaise and 1 teaspoon of honey mustard per slider square. I really just plop it on without measuring! (If you love honey mustard and ham like I do, don’t miss these hot ham and cheese subs with honey mustard.)
Smear the mayo and honey mustard into the buns. Top the buns with slices of mild cheddar cheese. You can use shredded cheese or another flavor if you prefer. Swiss cheese would also be pretty good with this recipe, but I like the stronger flavor of the cheddar most.
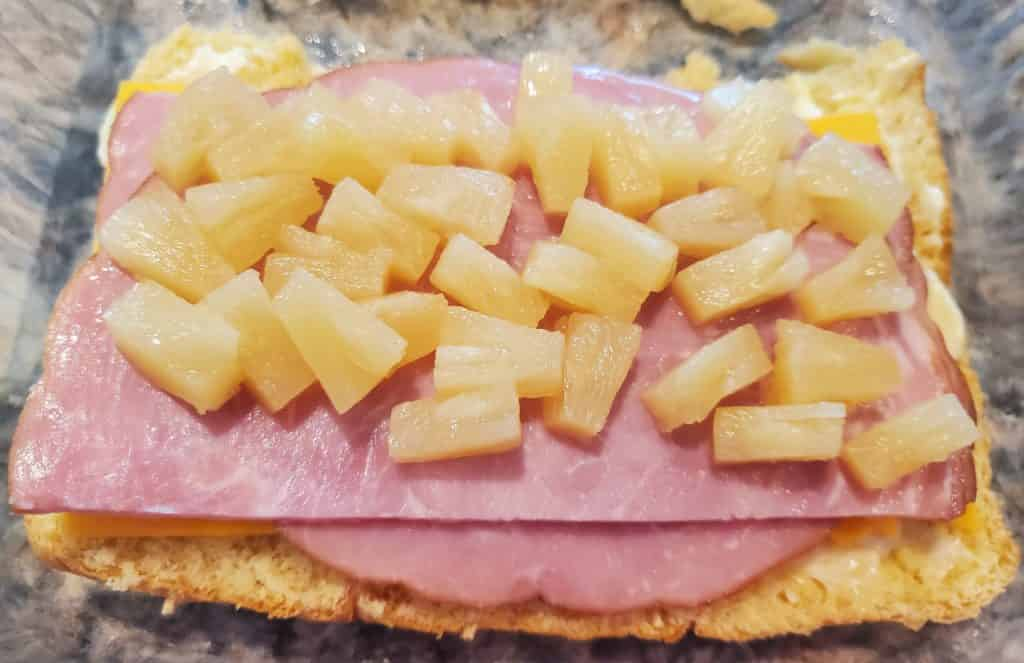
Top the cheese with slices of ham. I bought pre-sliced packaged ham. You could totally use deli ham or leftover ham for this recipe.
Now it’s time for the pineapple. I have used pineapple slices for this recipe, but I actually like pineapple tidbits for these ham and pineapple sliders more because it is easier to eat and spread the pineapple out more over the sliders. For 6 sliders, I used one 4-ounce snack cup of pineapple tidbits, drained.
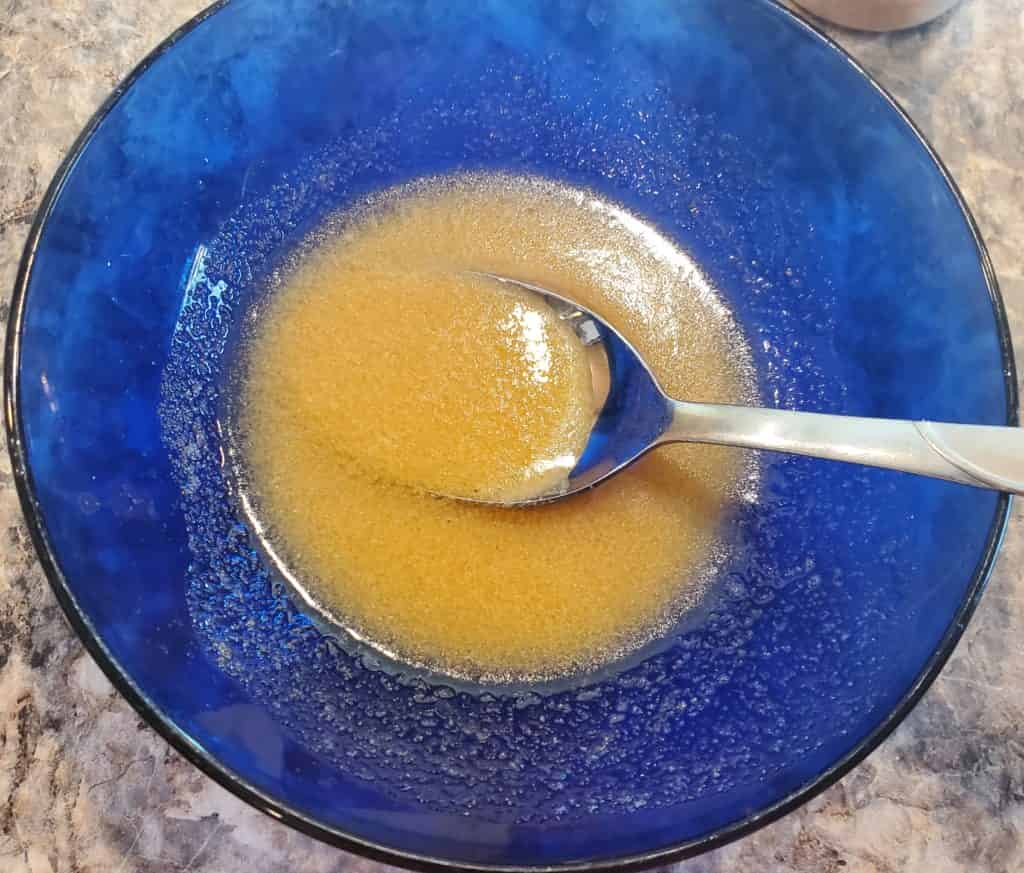
Add the top bun and then melt 3 tablespoons of butter in the microwave. Mix in 1/4 teaspoon of garlic powder and 1/2 teaspoon of onion powder. Stir until combined. (Mine usually ends up kind of like wet sand.)
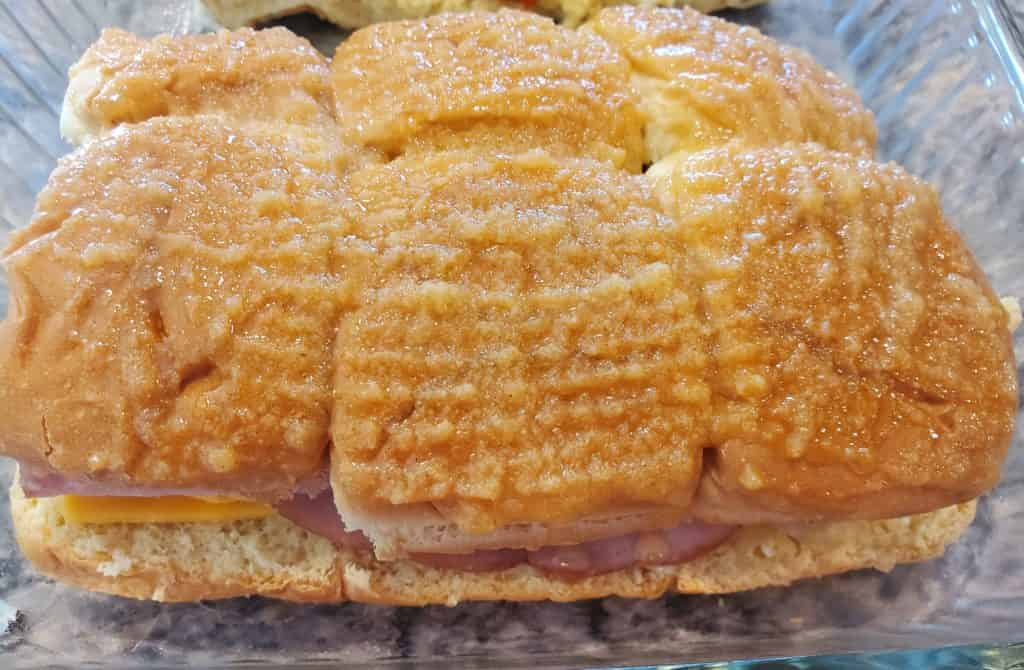
Brush the garlic butter over the top of the buns.
Bake at 350-degrees for 20 minutes until the tops are golden brown and the cheese is melted.
Cut them apart and serve warm. Store leftovers in the refrigerator.
Ham and pineapple sliders
Stacey A. Shannon
These easy ham and pineapple sliders are great for family dinners or carry-ins and can easily feed a crowd!
1/2teaspoononion powder(dried minced onion also works)
Instructions
Preheat the oven to 350-degrees. Spray a 9×13 baking dish with non-stick cooking spray.
Cut the Hawaiian rolls in half through the middle to turn them into slider buns. Put the bottom half of the rolls into the baking dish; set aside the tops for now.
Dollop the mayonnaise and honey mustard onto the buns in the baking dish. Smear the mayo and honey mustard evenly over the buns.
Layer the cheese, ham and pineapple on top of the prepared bottoms.
Put the top of the rolls on.
Melt the butter and then add in the garlic powder and onion salt. Mix it well and then brush the butter mixture over the top of the sliders.
Bake the sliders for 20 minutes until the tops are browned and the cheese is melted.
Keyword carry-in recipe, crowd pleaser, ham and pineapple, leftover ham, leftovers recipe, pineapple recipe, pitch-in, slider recipe, sliders
Even picky eaters will love the delicious ranch meatballs in this soup!
My family isn’t big on eating meat. My husband and son eat very little meat while my daughter and I eat some. So, when I tell you I’ve found a ranch meatball recipe our family really likes, then you know it has to be good! Paired with taco flavors and a slightly cheesy soup, this taco ranch meatball soup recipe is a great family dinner option.
I have served this with tortilla chips and with cornbread. Since the cornbread pairs so well with taco flavors in the taco cornbread bake, I figured it was worth a try with this soup. Turns out I was right! We’ve decided that cornbread is our favorite. In fact, we put the cornbread in the bowl and then put the soup and meatballs on top. It’s a filling dinner with a bit of Mexican flavor.
Make the ranch meatballs
The taco ranch meatball soup starts with making the meatballs. The soup comes together and simmers for a few minutes while the meatballs cook. When I first made this recipe, I used half the amount of ground beef called for because we aren’t big on eating meat. But since then I’ve used the full 1-1/2 pound of ground beef. Our family of four ends up with a few extra ranch meatballs, but not too many! (And they make a good meatball sub topped with a bit of ranch dressing!)
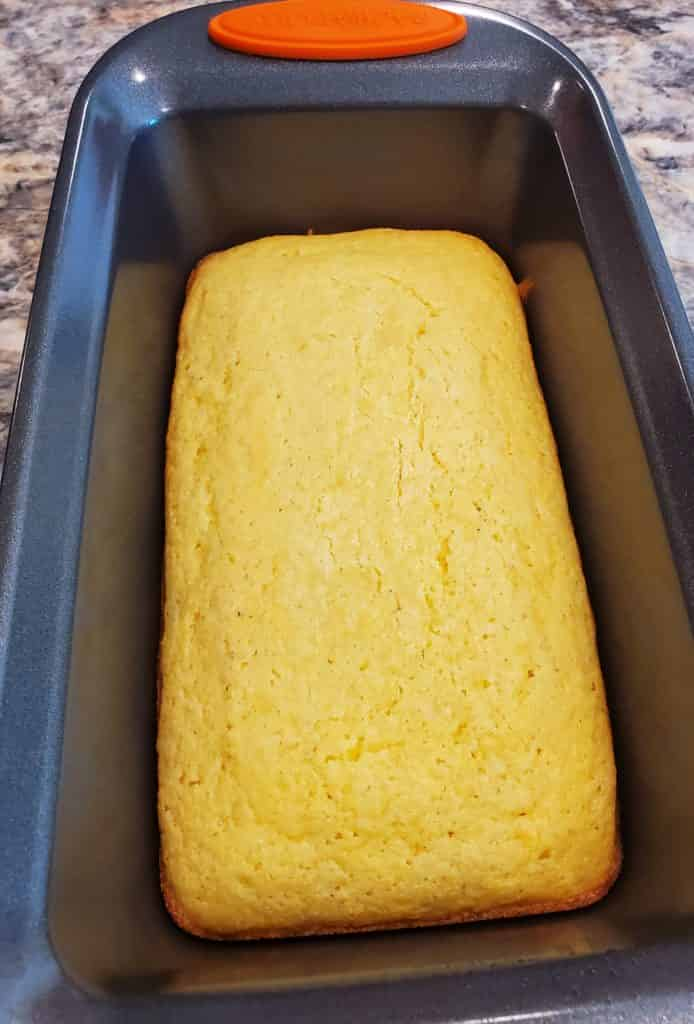
Preheat the oven to 400-degrees (F). If you are making cornbread to go along with this, mix it and set it aside. I use a JIF cornbread mix and pour it into my loaf pan to bake a loaf. It bakes in the same amount of time as the meatballs, so it works quite well! This is how my finished loaf turns out:
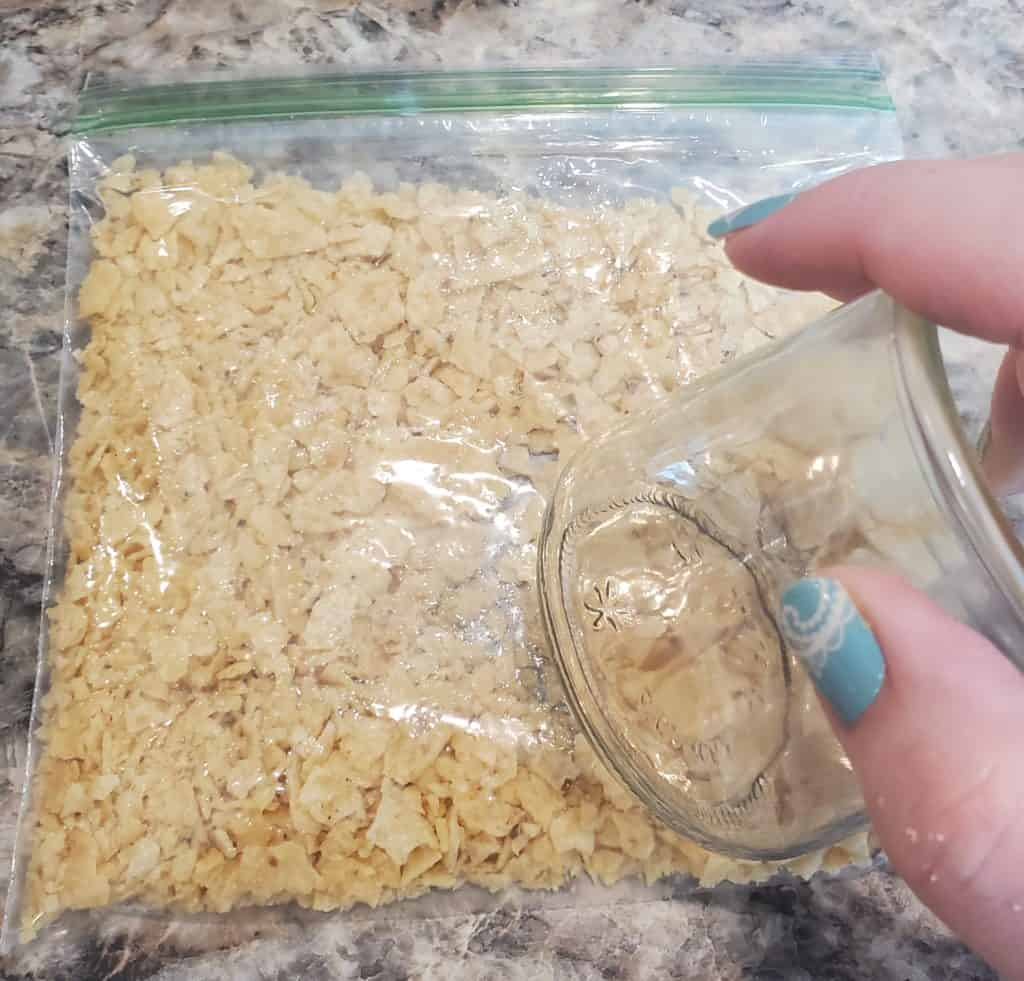
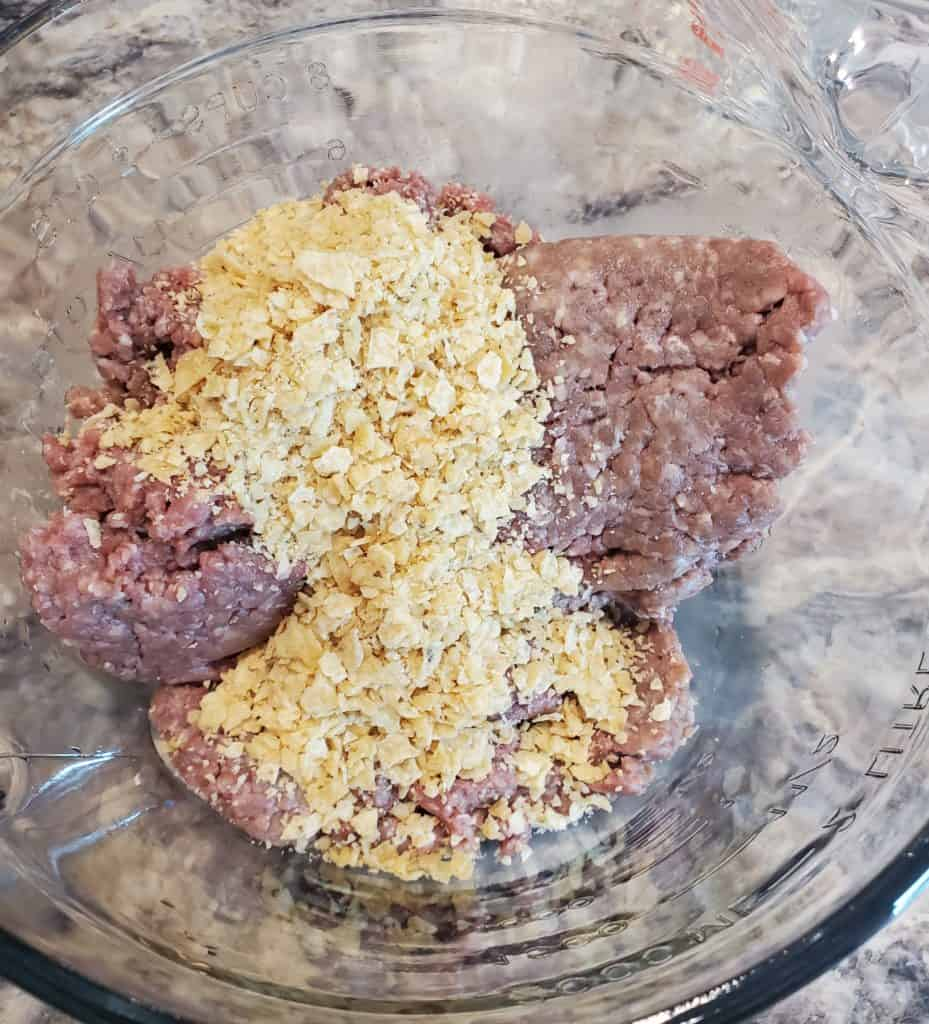
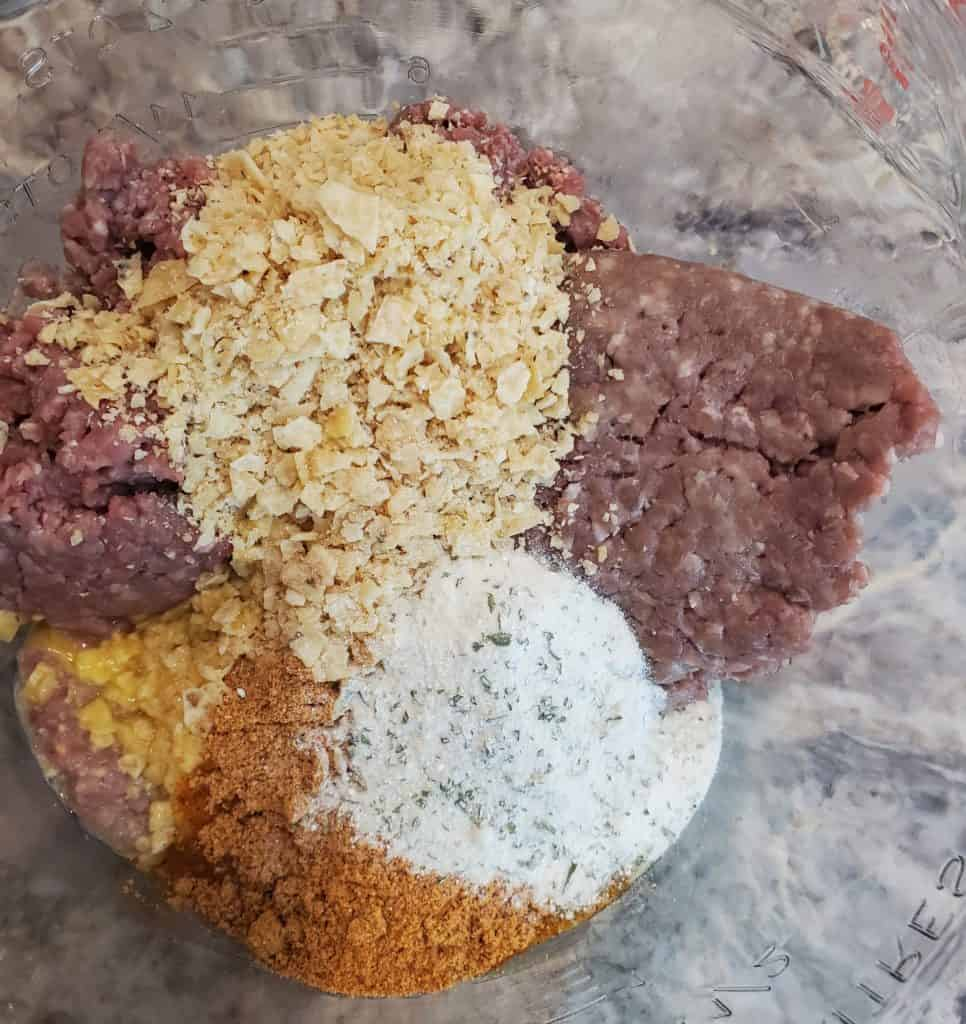
Put 1-1/2 pounds of ground beef in a mixing bowl. Add in 1/2 cup of crushed tortilla chips. I fill a sandwich bag about 3/4 full and then crush the chips with a glass. While I use corn tortilla chips, I think these ranch meatballs would also be good with flavored cheddar or ranch tortilla chips.
Add the tortillas to the meat.
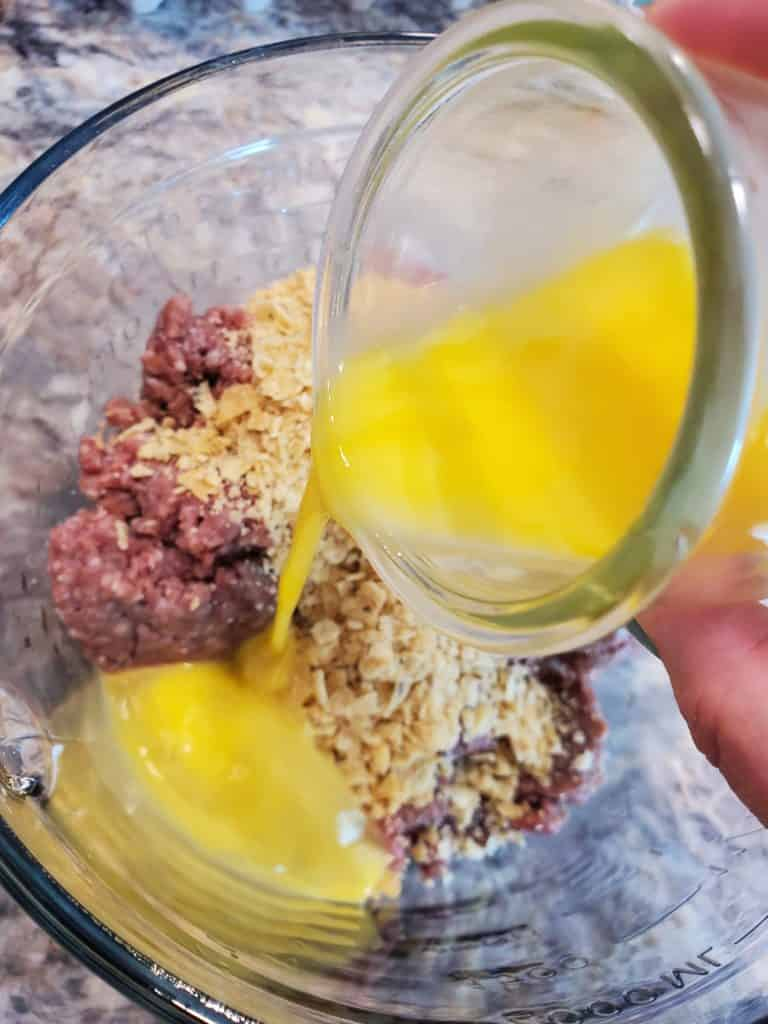
Next beat one egg in a small glass (I use the same one that I use for crushing my chips). Add the beaten egg to the meat mixture.
Next, add 1 tablespoon of ranch dressing mix and 1 tablespoon of taco seasoning to the meat mixture. (There is also something called rancho taco seasoning. If you buy that, then put in one 1-ounce packet. Save an additional packet for the soup.)
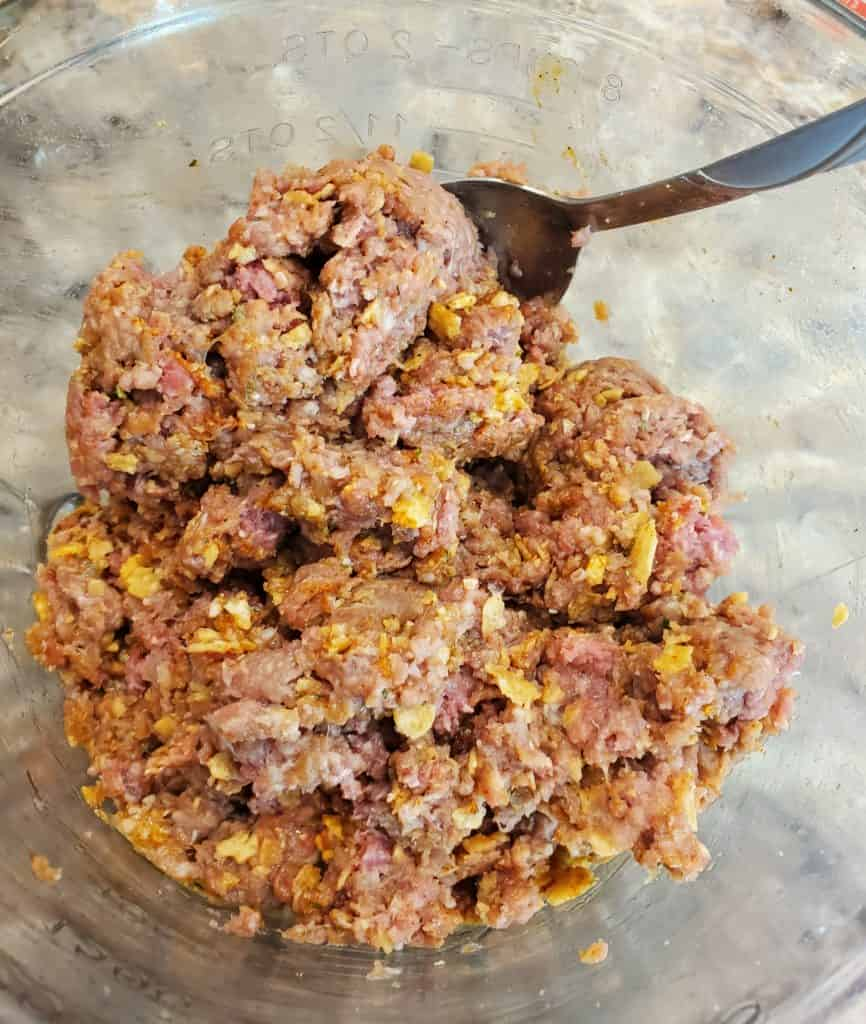
Use a spoon to combine the meat mixture together well. You can use your hands if you really want to, but I find this stirs together well with a spoon. Do what works for you!
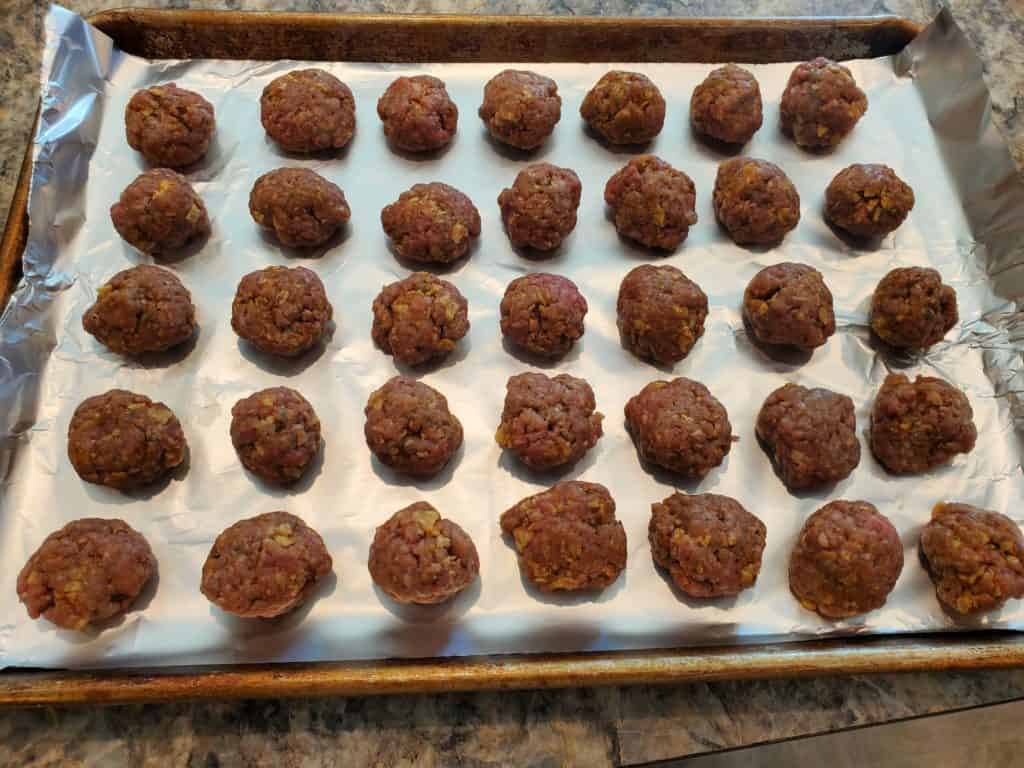
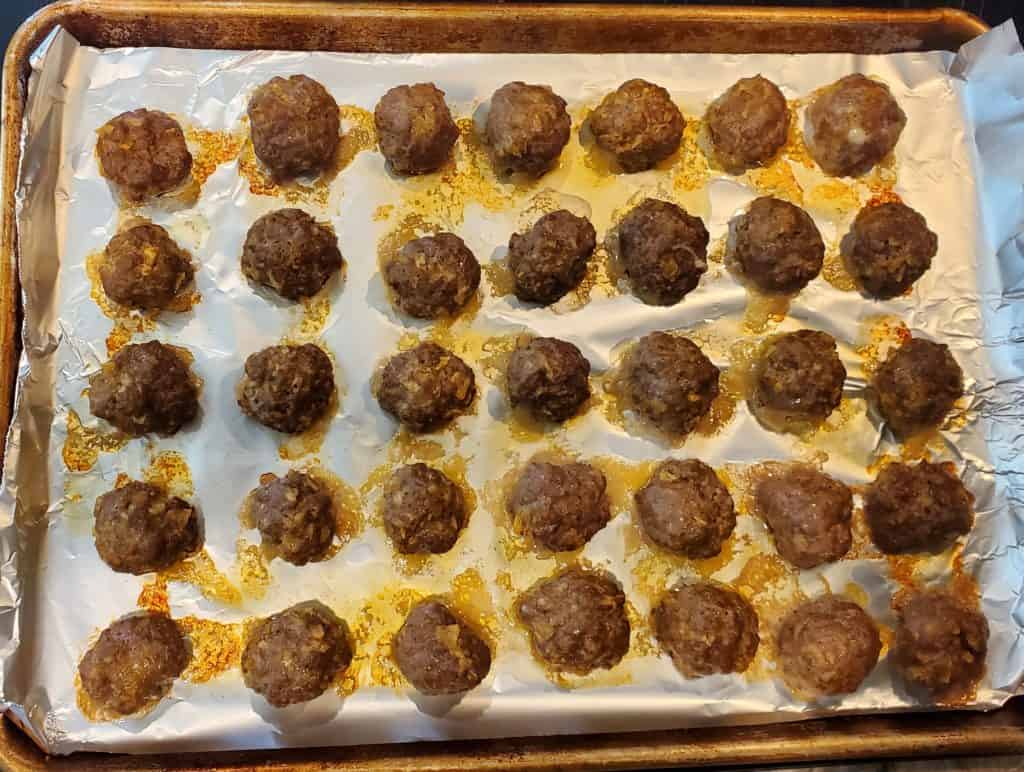
Once the meat is combined, then form it into 1-inch balls and place them on a rimmed baking sheet lined with non-stick aluminum foil or parchment paper. I use the non-stick aluminum foil to make for even easier clean up!
Put the meatballs (and cornbread if you’re making it) into the preheated oven and baked for 15 minutes.
Make the soup
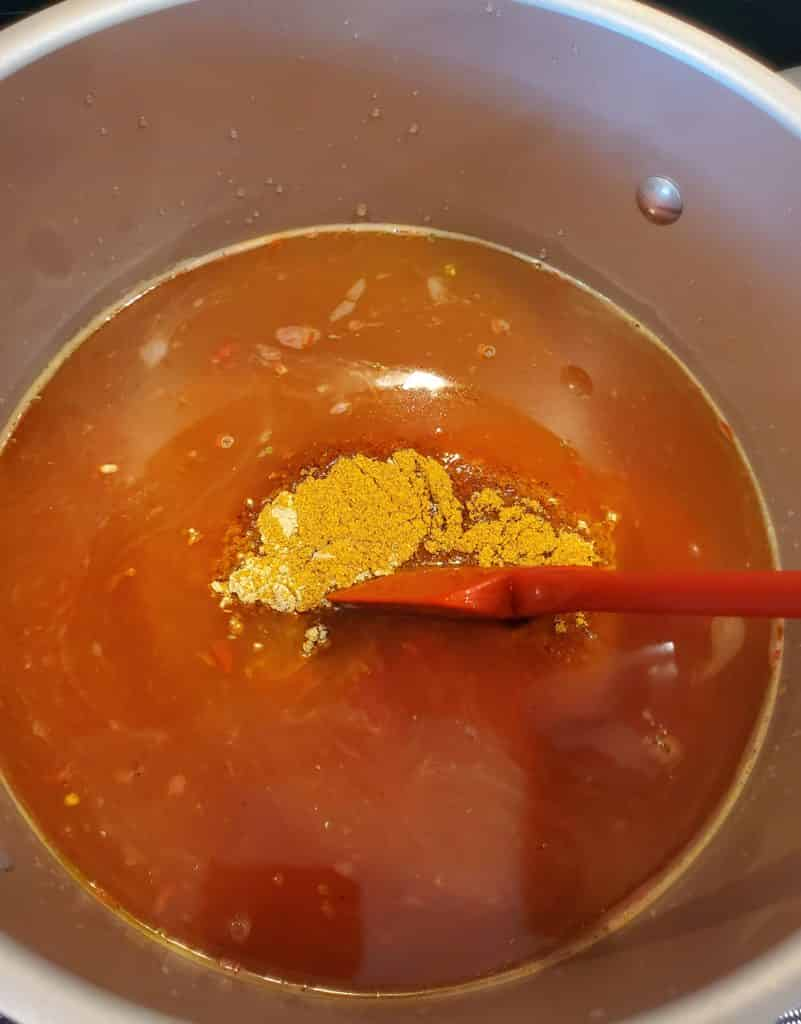
While the ranch meatballs are baking, put 32-ounce of chicken broth into a large pot over medium-high heat on your stove. Add in one 15-ounce can of crushed tomatoes, 1 tablespoon of taco seasoning and 1 tablespoon of ranch seasoning. Cover it and cook for about 15 minutes.
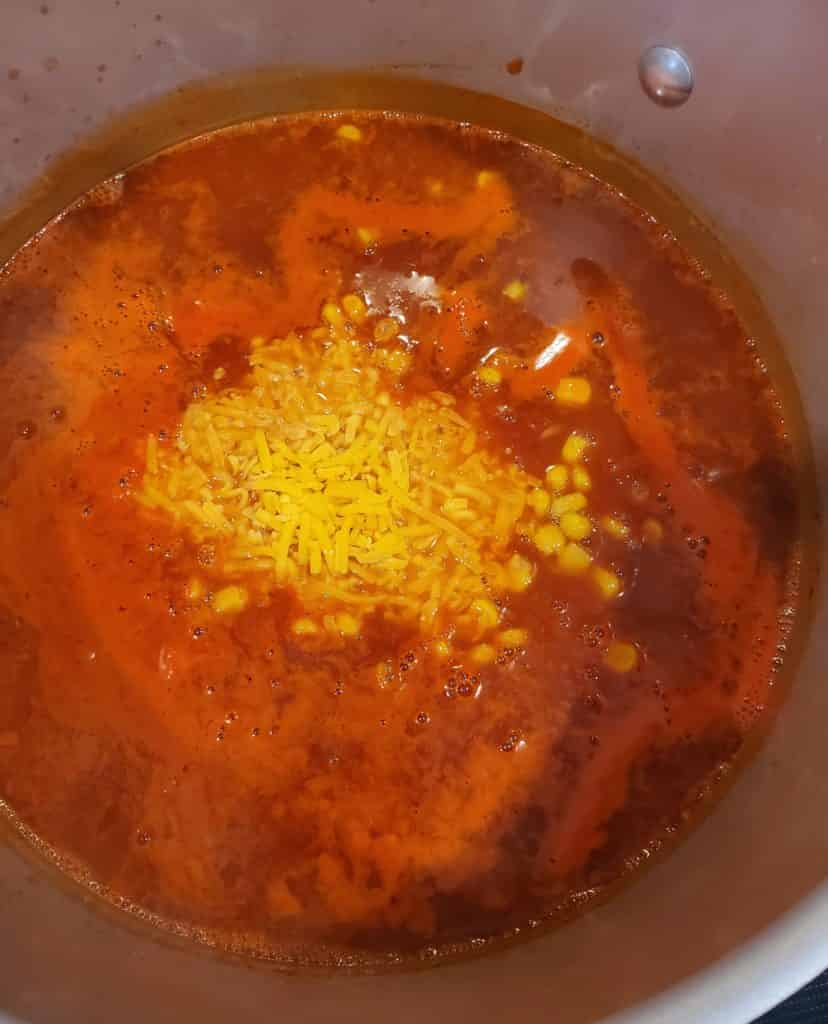
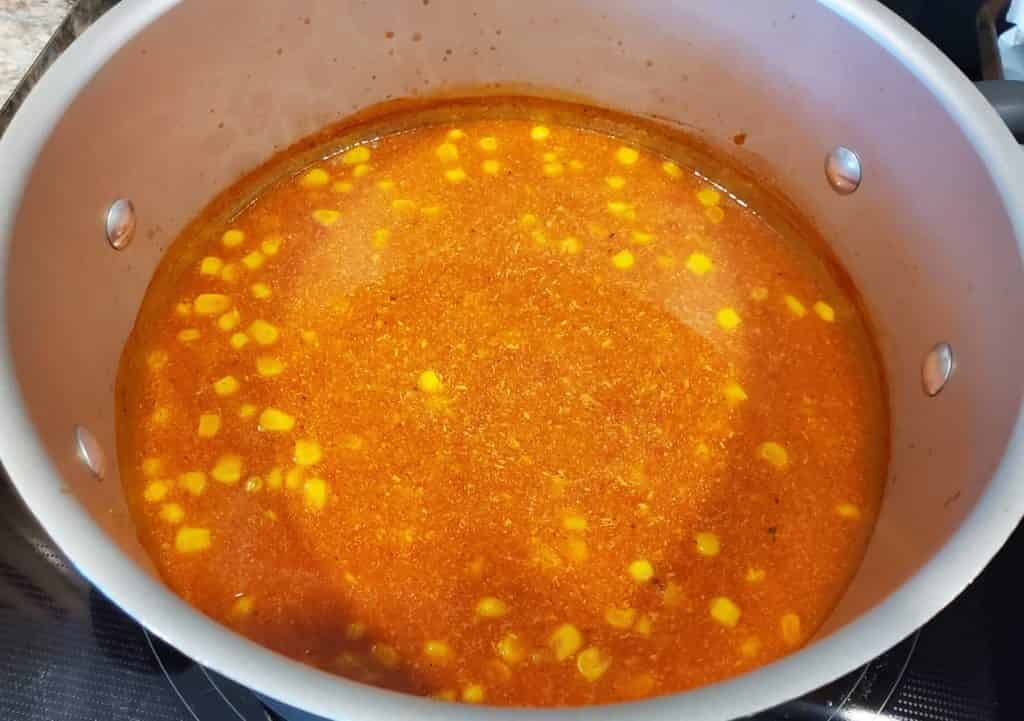
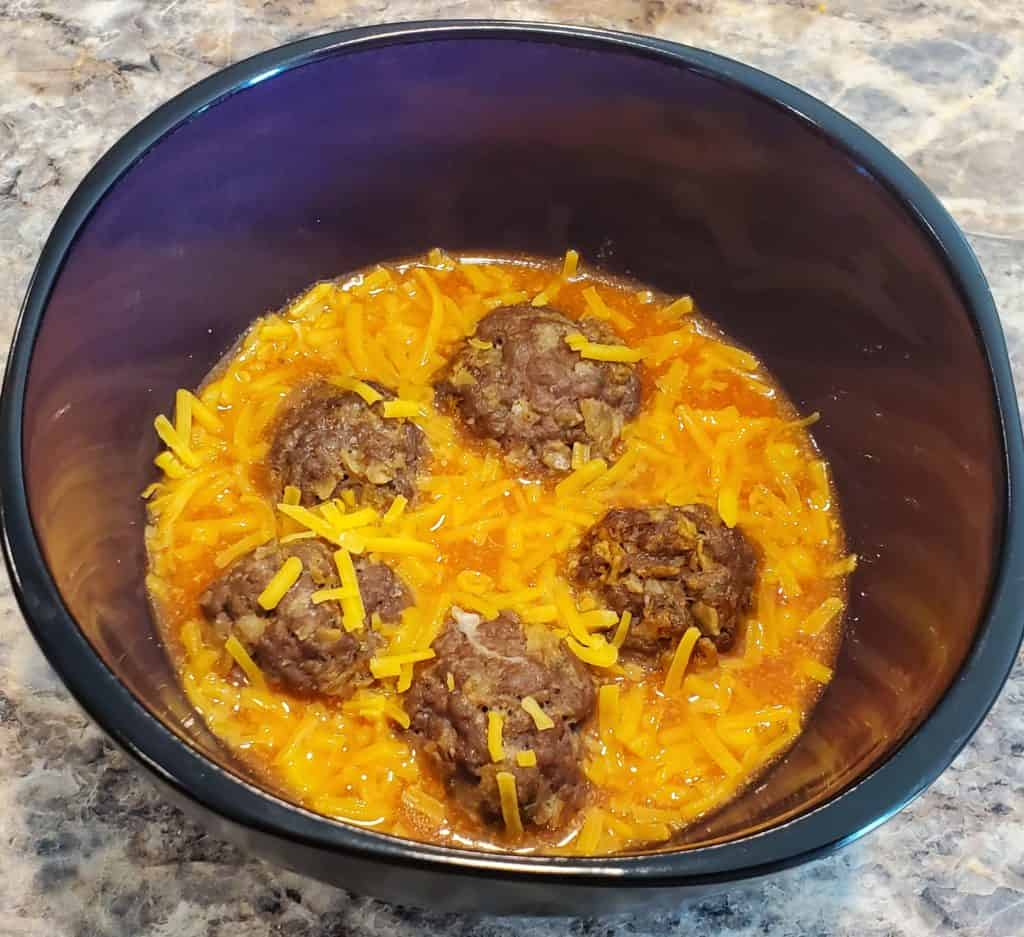
Turn the heat down, leave the lid off and add in one 12-ounce package of thawed frozen corn and 1 cup of shredded cheddar cheese. It’s best to add the cheese in slowly. I usually do it in thirds. Let the cheese melt. Simmer, uncovered for about 10 minutes.
Putting it all together
By the time your soup is ready, your ranch meatballs should be as well.
You have two options with this taco ranch meatball soup recipe: you can mix the meatballs right into the soup or you can leave them on their own and let everyone mix them in themselves. Our family prefers to leave the ranch meatballs separate. That also works better if you end up with leftover meatballs that you want to turn into a meatball sandwich! So, I move the meatballs to a plate covered with a paper towel to remove some grease. If you prefer, pat them off and put them right into the soup.
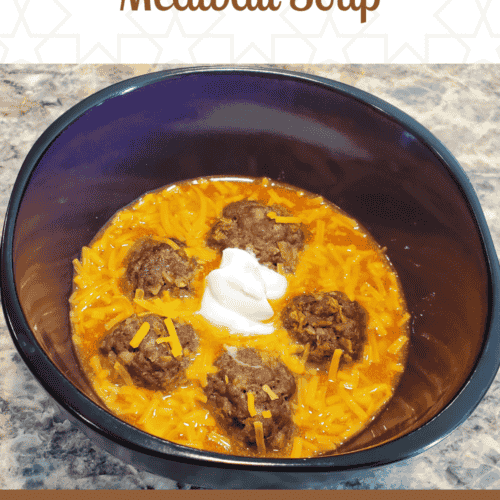
You’re ready to build your bowls of taco ranch meatball soup. You can put cornbread on the bottom, then top with soup and meatballs or skip the cornbread and just do the soup and meatballs.
Either way, it’s yummy to sprinkle some extra cheddar cheese on top.
And if you’re a big fan of sour cream like my family is, plop a dollop of sour cream on there as well!
Taco ranch meatball soup
Even my pickiest eaters like this taco ranch meatball soup recipe. It's a simple, yet filling family dinner idea!
1cupshredded cheddar cheeseplus extra for topping if desired
Instructions
Preheat the oven to 400-degrees (F).
In a mixing bowl, combine the ground beef, crushed tortilla chips, beaten egg, 1 tablespoon of ranch seasoning and 1 tablespoon of taco seasoning.
Form the meat mixture into 1-inch balls and place them on a rimmed baking sheet lined with non-stick aluminum foil or parchment paper.
Bake the meatballs for 15 minutes.
While the meatballs bake, put the chicken broth, tomatoes, 1 tablespoon of ranch seasoning and 1 tablespoon of taco seasoning into a pot over medium-high heat. Cover and cook for 10 to 15 minutes.
Reduce the heat on the stove and add in the corn. Gradually add shredded cheese. Simmer, uncovered for 10 minutes.
When the meatballs are finished, you can pat them dry and place them in the soup or move them to a plate covered with a paper towel to dry and serve separately. (One benefit of serving separately is it makes leftover meatballs easier to use for sandwiches!)
Serve the soup with the meatballs and top with additional shredded cheese, if desired. Sour cream is also good with this soup. It pairs very well with cornbread.
5 Ideas for busy Christian moms to connect with God
Affiliate links are used in this post; if you make a qualifying purchase via my link, I receive a small percentage of the sale at no additional cost to you. I only recommend products and services I use and love. It helps support my blog, so thank you for your support! Read my full disclosure here.
Finding ways to connect with God can be challenging for anyone. But Christian moms in the thick of raising children can really struggle to find ways to connect spiritually with God. We are pulled in multiple directions at the same time, our thoughts are often interrupted and quiet time can be nearly nonexistent (especially for moms of littles!).
But finding ways to connect with God is important not only for our own spiritual walk but also for our spiritual leadership for our children. I want to demonstrate what a real-life relationship with God looks like to my kids. And I know the more in-tune I am with God, the better mom I am.
The struggle is certainly real, though. Being nearly 13 years into motherhood, I’ve had times where I felt more distant from God in the everyday pressures and busyness of raising children. I never got away from Him, but finding time to spend with Him has been difficult at times in my life.
Encouragement for moms of littles
When I had a toddler and baby and was getting almost no sleep at night, my brain could focus only on survival — and even that was iffy some days! During that phase of my life, I learned God knew exactly where I was and what my struggles were. Just because I was running low on time to read my Bible and pray for longer times, He knew right where I was. I was honoring and serving Him in taking care of the children He blessed me with.
Also during this time I was reminded of God’s grace. He knew my capacity and saw my struggle. I still remember a Sunday morning sermon from this time in my life. Well, I don’t remember the sermon itself. I got distracted by a verse that my pastor read from Isaiah.
He tends his flock like a shepherd: He gathers the lambs in his arms and carries them close to his heart; he gently leads those that have young.
Isaiah 40:11 (NIV)
Our Father knows how difficult it is for moms with littles. He gently leads us. I didn’t need to feel guilty; I could just rest in Him. If you’re in that phase of life right now, know God isn’t angry with you when you don’t have as much time to spend with Him as you once did. Through the years, you will learn new ways to connect with Him — and that’s OK! In fact, that’s what this post is all about.
1. Utilize alone time in the bathroom.
My kids are now both in school all day, and I still struggle with finding alone time! That’s in part because my husband and I work from home together, but I know I’m not alone in this challenge. The most consistent alone time I have is when I’m in the shower and getting ready for the day. So, I use that time to connect with God.
It sounds weird to talk about getting spiritual in the bathroom, but it works. Even before I had children, I found that praying in the shower works well for me because I have no distractions or interruptions. I am performing a sort of mindless task and can focus on God more easily; I still continue to do that.
I usually spend about 10 minutes drying my hair on low with a diffuser (the joys of curly hair!). So, that’s when I read my devotion book and Bible then pray over requests on my prayer list I maintain in a free app on my phone.
I don’t shower every morning. If I do my hair turns to cotton candy! Plus, I also shower at night sometimes. So on those mornings, I start praying while I’m brushing my teeth. That may sound a bit silly, but it works for me to associate prayer with part of my routine.
More recently I’ve started listening to sermons while I’m getting ready. It started during the season of Lent and has continued. My absolute favorite is Sarah Jakes Roberts. She preaches the Word in such a relatable way. My daughter first discovered her. I checked her out to make sure she was OK for my 12-year-old and found that I love her just as much. She encourages me in my spiritual walk and connecting with God.
2. Connect with God in the car.
Another great time time to connect with God is in the car. This is true especially if you get alone time in the car. I’m at a phase of motherhood where that happens more regularly now as I’m driving to pick up the kids from school and such. I have used this time to listen to Sarah Jakes Roberts’ sermons, but what I do mostly is listen to Christian music.
Music is powerful and connects me with God more easily than anything else. Listening to Christian music helps me to focus on Him and reminds me of His presence. I maintain a Families with Grace playlist on Spotify that I usually listen to in the car (and while I work). Christian radio also works. And I continue the music with my kiddos in the car as well.
If you do happen to find yourself alone in the car, it can also be a great time to talk with God (eyes open, of course!). I’ve done that before, but more often I use car time for praise and worship music.
3. Get up early (or stay up late).
When my kids were little and at home all the time, I’d get up early to have quiet time with God before the day started. This was past the earlier days I mentioned with a toddler, a baby and minimal sleep. Having 15 minutes to read my devotion book and Bible and pray got my day started off well. It was often my only quiet time in the day.
If you aren’t a morning person, consider doing this at night before bedtime if you can. If your kids still take naps, use part of naptime to connect with God. Find something that works for you and your schedule, even if it isn’t every single day. Connecting with God isn’t an all or nothing activity. Small ways you connect with Him add up and help you grow spiritually.
4. Utilize resources to get into the Word.
This is my 2022 devotion book that I’m really enjoying.
I’ve been in church my entire life and have heard more times than I can count the importance of regularly getting into God’s Word. I agree completely, but what I don’t often hear is what that looks like and how to make that happen.
Honestly, if I pick up my Bible and just start reading at random, I don’t always get a lot out of it. My mind can start wandering even as I’m going through the words. I can struggle to connect what I’m reading to my own life.
For that reason, I most enjoy using a devotion book along with my Bible reading. I’ve used a variety of them through the years and do a different once each year. My 2022 devotion book is “Not Without You” by Natasha D. Frazier. (It’s free on Kindle Unlimited!) Each entry is relatively short, but packs a punch. It includes a focus verse but also additional verses for reading.
No matter what devotion book you pick, make sure it is focused on the Bible and encourages you to read from the Bible regularly. I enjoy having my devotion book on my Kindle and use the Kindle app on my phone along with the YouVersion Bible app to read. I love it’s all portable, so if I end up getting behind or not having a chance to read during my usual time, I can read anywhere I am when I am able to.
5. Have a verse of the day.
Reading your Bible and delving into God’s Word is important to help you connect with God and grow in your spiritual walk. Along with that, I’ve found having a verse of the day is helpful. Right now, I’m using a flip calendar on my desk that a friend gave me. It’s all about walking by faith and each day has a Bible verse or encouraging spiritual statement. It’s simple and I really like it.
Scripture cards are also a great way to focus on a verse a day. You can put them in an envelope or attach them with a ring binder clip and rotate through them to keep yourself encouraged and focused on God’s Word each day.
An easy cheesy hash brown casserole recipe your family will love!
Affiliate links are used in this post; if you make a qualifying purchase via my link, I receive a small percentage of the sale at no additional cost to you. I only recommend products and services I use and love. It helps support my blog, so thank you for your support! Read my full disclosure here.
I love potatoes. I can’t think of a way to prepare a potato that I wouldn’t eat from fried to boiled to mashed to baked! But this party potatoes recipe is hands-down my most favorite potato recipe of all time. While this recipe is almost the same as the one my mom has made for years, it has a couple of slight differences to make it even creamier and oh-so-delicious!
Another bonus of this party potatoes recipe is it uses frozen hashbrowns, just like my slow cooker potato soup. You get to enjoy the potato-y goodness without having to scrub, peel or cut potatoes. And that makes this recipe even easier to come together. You basically mix together the ingredients and then bake them. Easy-peasy!
I will eat these potatoes fresh from the oven and reheat them for leftovers. I’d guess that you could freeze and reheat them later, but they never make it that long around my house.
When it comes to a cheesy hashbrown casserole like these party potatoes are, I think there’s never a wrong time to make them. I’ve made them for Thanksgiving and for cookouts. In my opinion, they go with just about anything and everything! (I told you I love them!)
Let’s get this party potatoes recipe started!
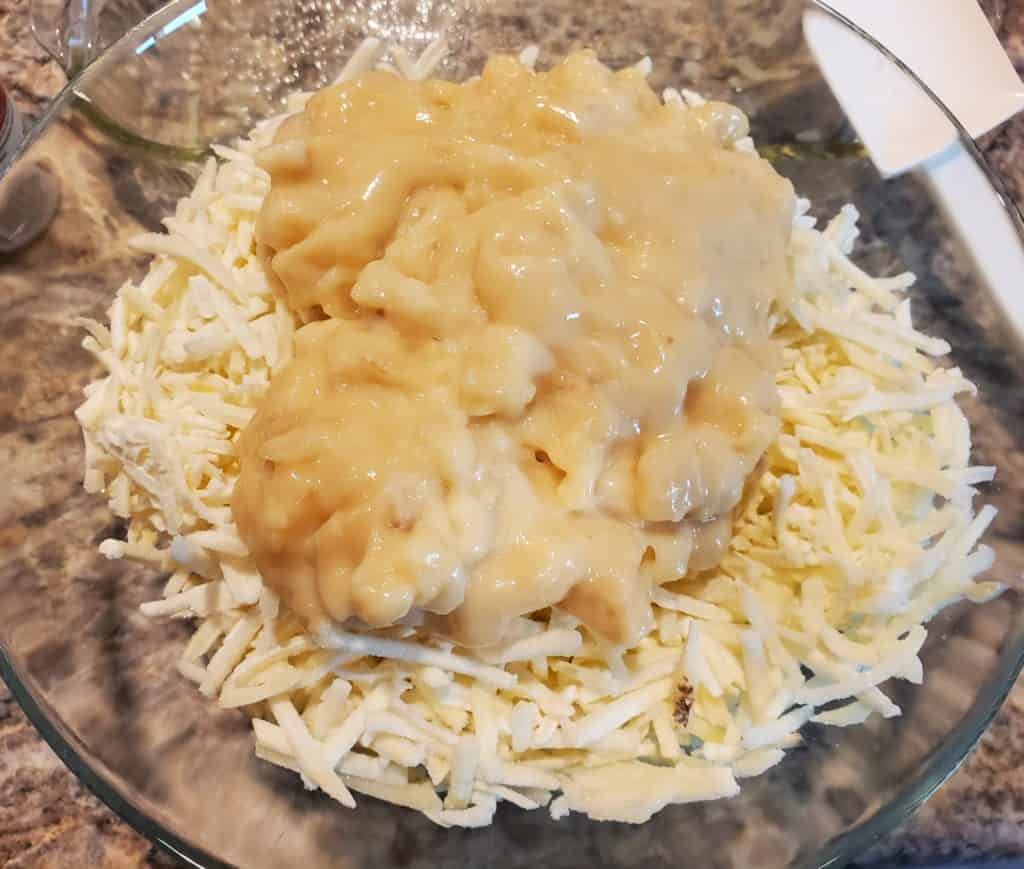
Like any oven recipe, start with preheating your oven to 350-degrees (F). Next, find the biggest bowl you have. I use a giant glass bowl I got at IKEA a few years ago, but any extra-large bowl will work. Pour in the whole 30-ounce bag of frozen shredded hash brown potatoes.
Plop two cans of either cream of potato or cream of chicken soup on top of the hash browns. I have made it with both types of soup and love it both ways. It really is up to you on that one. Maybe go with whatever you have on hand, is easiest to find or is cheapest. Either kind of soup works well in this party potatoes recipe.
While other party potatoes recipes put the shredded cheese on top, this one mixes some right in with the hash browns for cheesy-ness all throughout. Add in 1-3/4 cup of shredded cheddar cheese.
And then, finally, add in 1 cup of grated Parmesan cheese. Shredded Parmesan cheese might work, but the grated works best for giving it more cheesiness flavor but without getting stringy. Combine all of the ingredients together in the bowl.
Get ready to bake!
Once the hash browns, soup, sour cream and cheeses are well combined, pour the mixture into a 3-quart baking dish that has been coated with non-stick cooking spray. Pat the mixture with a spoon so that it is even throughout the pan.
Sprinkle the hash brown potato mixture with 1/4 cup of shredded cheddar cheese — or whatever amount looks good to you. Honestly, I don’t measure out this part. I just keep sprinkling cheddar cheese until it’s well-coated, but I am totally a cheese lover!
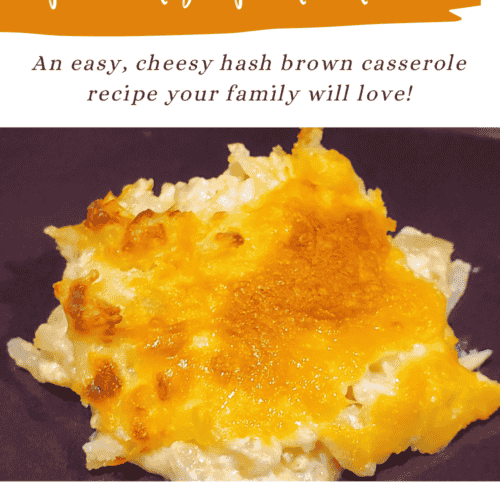
Bake the party potatoes in your preheated 350-degree oven for 40-45 minutes until the cheese is melted. If you want, turn your broiler on low for 2 minutes to get the top slightly browned and bubbly. And then enjoy the delectable cheesy goodness!
Party Potatoes Recipe
With just a couple of easy steps, this cheesy party potatoes recipe is great for a side dish any time and ideal for carry-in dinners!
130-oz. packagefrozen, shredded hash brown potatoes
210-3/4 oz. canscondensed cream of potato or cream of chicken soup, undiluted
2cupssour cream
2cupsshredded cheddar cheese, divided
1cupgrated Parmesan cheese
Instructions
Preheat your oven to 350-degrees (F) and spray a 3-quart baking dish with non-stick cooking spray. Set it aside.
In a very large bowl, combine the hash brown potatoes, soup, sour cream, 1-3/4 cups shredded cheddar cheese and grated Parmesan. Mix well.
Pat the hash brown mixture evenly into the prepared baking dish. Sprinkle with the remaining shredded cheddar cheese (or however much your family would like!).
Bake, uncovered, for 40 to 45 minutes until the cheese is completely melted and bubbly. If desired, turn your broiler on low for 2 minutes to get the top even more browned.
Let it stand a few minutes before serving. Store any leftovers in the refrigerator.
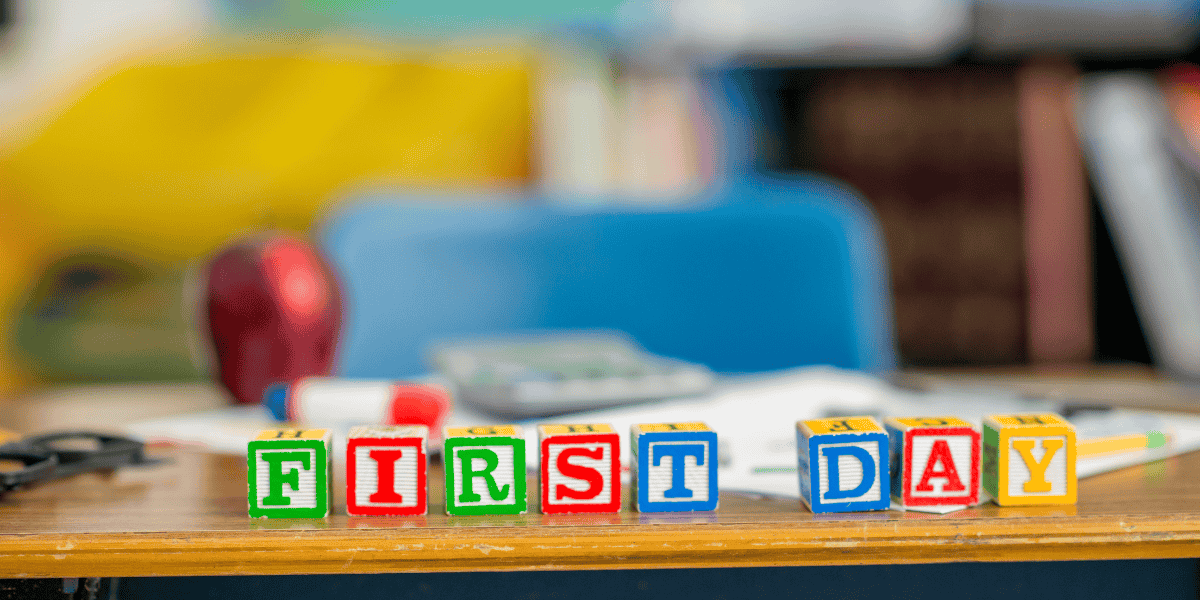
7 Simple first day of school traditions to kick off the school year
Back-to-school season can be exciting, stressful and downright overwhelming — all at once! In fact, I recently shared a short video about how overwhelmed I felt with the back-to-school to-do list for my kiddos! There are so many things for us moms to do to get ready for the first day of school. But one of the things I don’t want to miss each year is making it a good day for my kiddos. So, we have a few simple first day of school traditions we do each year.
I’m emphasizing the word “simple” here, because not only are simple traditions easier to keep, but the first day of school is exhausting. Nobody wants added stress and pressure — kids or parents! Plus the first day of school tends to bring along a lot of emotions as well, so it’s easy to get overwhelmed. Honestly, I get back-to-school blues each year as my kids return to school.1. Interview your kids.
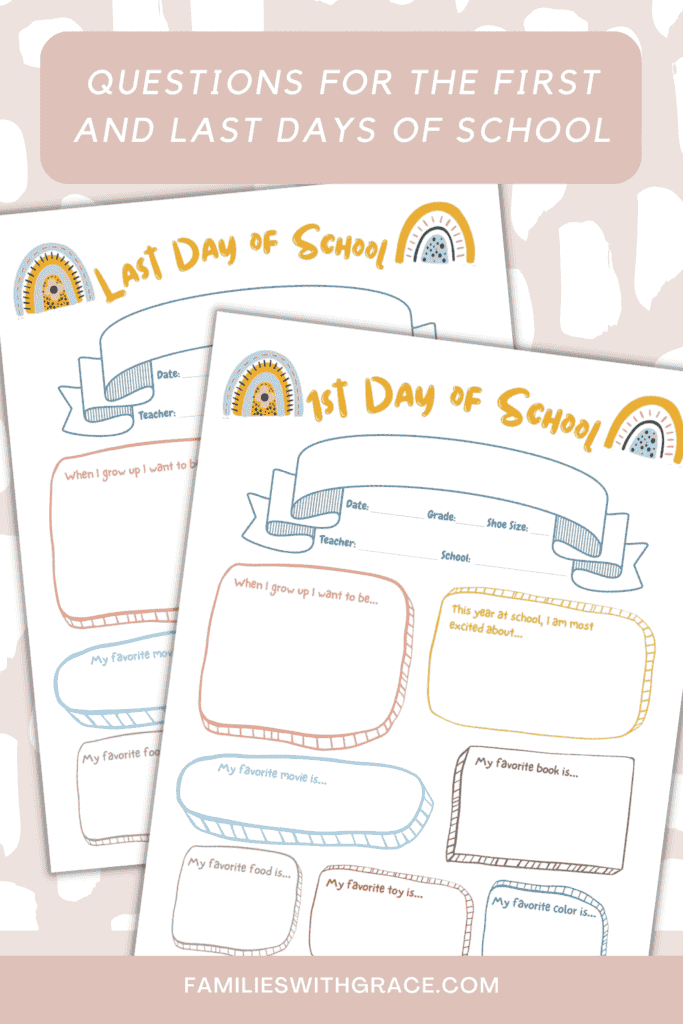
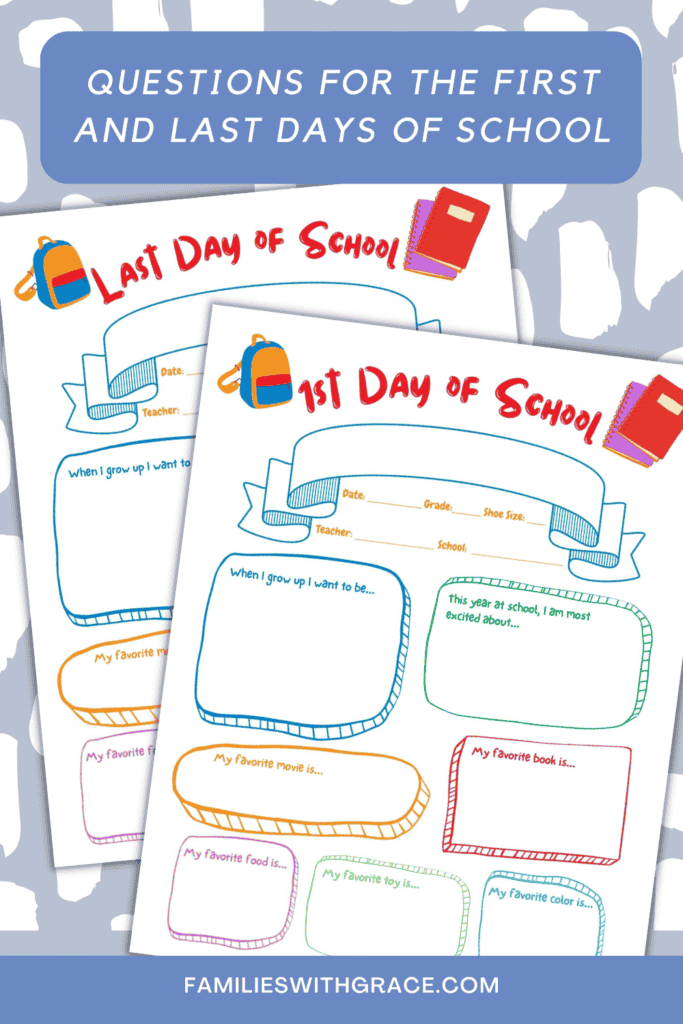
OK. I know this sounds a bit weird. But, listen, I’m a journalist by trade and I love interviewing my kids each year a day or two before they start school. I ask them about their favorites (food, books, movies, etc.), what they want to be when they grow up and what they’re most excited about for the new school year. Later on, it’s so fun to go back and see their answers. I video these interviews as well. I also do a little something else with them that you’ll find in tip number four!
And you can make the interview a keepsake as well with a decorative interview page like these I have in the Families with Grace Etsy store.
2. Prayer together for the new year.
Another first day of school tradition just before the first day is praying together about the school year. Our family has prayer time each evening as part of our bedtime routine. So, on the night before the first day of school I pray for the kids and their new school year. I also start praying weeks before on my own that God is with them throughout the school year and for specific concerns I have about the upcoming year for each of them.
3. Let them wear something new.
I always felt special getting to wear new clothes on the first day of school when I was a kid, so I’ve continued the tradition with my own kiddos. It doesn’t have to be an entirely new outfit, but just something new. For example, our school year starts mid-August which is still hot here in the Midwest. So my kids usually wear the shorts or pants they’ve been wearing all summer, but we pair it with a new shirt and new sneakers. (By the time their sneakers have survived summer, they are worn out and need to be replaced anyway!)
4. Turn first day of school photos into a cool “magazine” cover.
Every year I love making a “magazine” cover for my kiddos. I have done this since the year my daughter first started nursery school and have one for each of them for each year. It’s our version of a first day of school sign. I usually share the cover digitally with friends on social media and then print out a copy of it to go in their folder for the school year that I use to organize their school papers.
Along with a photo of the kids that I take in the morning before we leave, I include a lot of the information from their interview in tip one as well as other things like their shoe size and teacher’s name. (Seasoned mom tip: Get everyone up 10 minutes earlier than necessary on the first day of school so you aren’t super rushed through photos!)
I’ve got a template for sale in the Families with Grace store on Etsy if you want to make magazine covers part of your family’s first day of school traditions. Check it out:
5. Send a sweet lunchbox note.
If your kids take their lunch to school, send along a sweet lunchbox note. Honestly, I send notes daily because I really enjoy it. But I know that’s not everyone’s thing. However, I encourage you to send one on the first day to help your kids feel special and have a sweet token from home on their first day back to school.
When it comes to first day of school traditions, this is not too hard to pull off. Our tradition has been to pick the kids up from school and take them for an early dinner at Fazoli’s, because it is their favorite restaurant. Fazoli’s is pretty quick, which is what we’re looking for. If you’d rather, though, plan to make their favorite dinner at home. Or have a special treat to commemorate the day. I have a cousin whose first day of school tradition involved a cookie cake each year. Go with what your kids will like, but keep it low-key. They’ll be hungry and tired. The biggest goal is to have time together to hear all about their days. For our family, letting someone else do the cooking means we get to have those conversations all together easier. And going out for dinner on a school night is a treat!
Everyone is tired on the first day of school, no matter how much you’ve been preparing for it. When my kids were little and just getting into the school groove, we’d start a week ahead of the first day and practice getting up earlier each day and making sure we were ready on time. Now they are older, and we’ve been at this longer. So, we have our school morning system down pretty well. (It also helps that they go to a K-12 school and always have the same start time!)
But no matter what, the first day back is exciting and exhausting. Planning some big celebration that night is just not going to go well. Let them be low-key on their first day back to school. Maybe even plan to watch a movie together!
What are your family’s first day of school traditions?
Affiliate links are used in this post; if you make a qualifying purchase via my link, I receive a small percentage of the sale at no additional cost to you. I only recommend products and services I use and love. It helps support my blog, so thank you for your support! Read my full disclosure here.
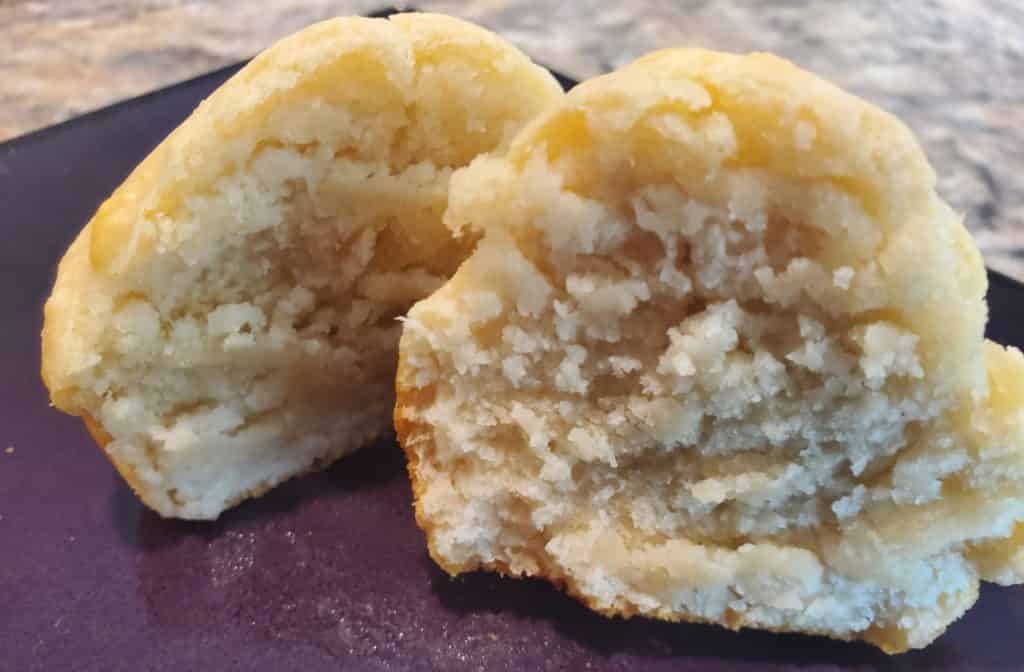
I had trouble believing that three ingredients could turn into biscuits, but they did. Even better is they are ingredients we have at home. And since they take about 20 minutes from start to finish, they are great for weeknight dinners. This biscuit muffin recipe is definitely entering into our recipe rotation!
Making the dough
This recipe calls for self-rising flour. If you usually like all-purpose flour like I do, you can easily make it self-rising by adding 1-1/2 teaspoon baking powder and 1/4 teaspoon salt for each cup of flour. My daughter made it with self-rising flour with her Nana. With me she made it with all-purpose that we turned into self-rising. The biscuits turned out well both times. If you have all-purpose flour only, then your recipe will change to 5 ingredients with the salt and baking powder. But still not so bad, right?!
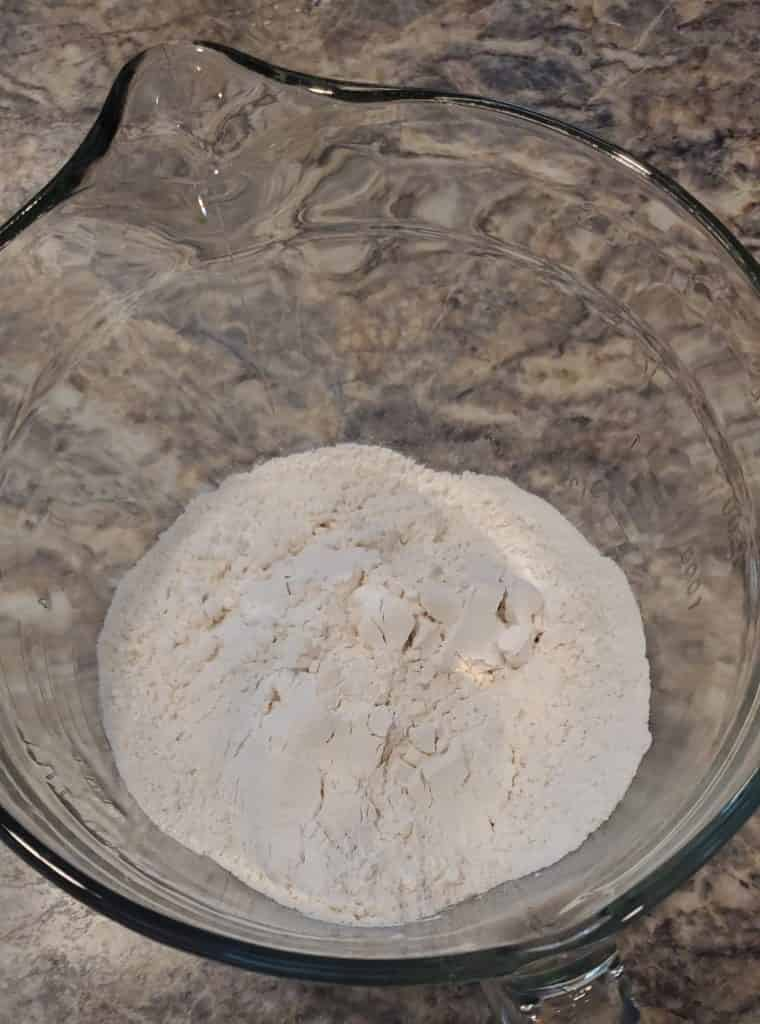
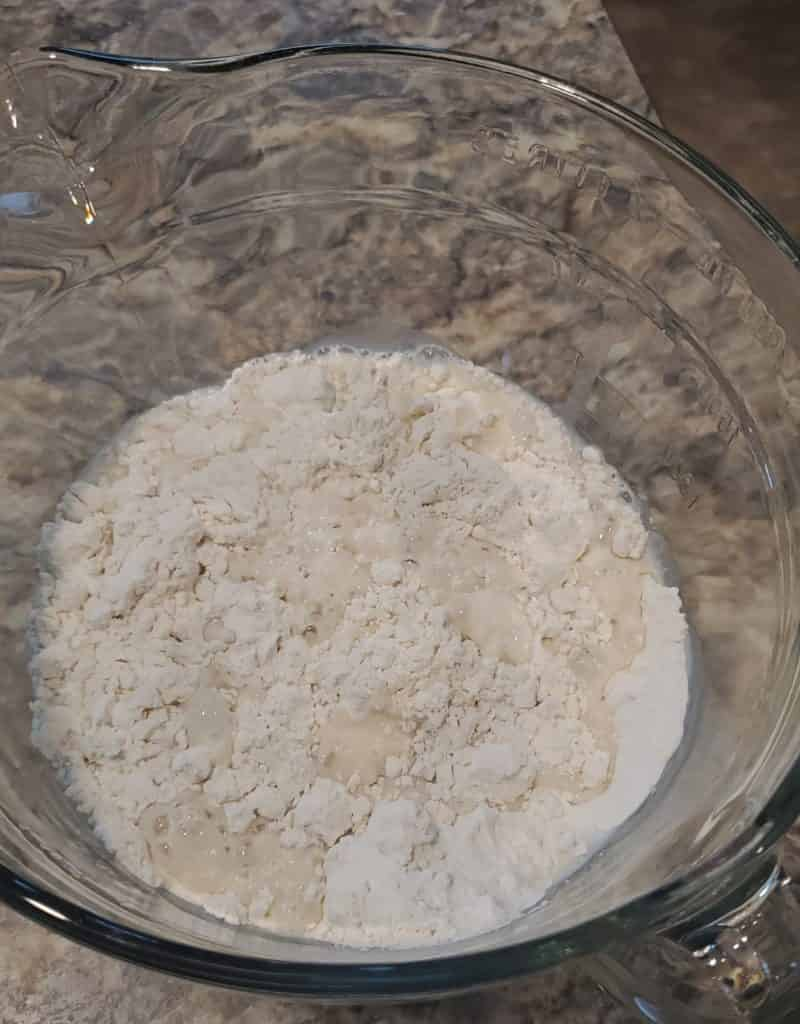
Get your oven preheating to 375-degrees, and then start by putting 2 cups of self-rising (or “doctored” all-purpose) flour into a large mixing bowl.
Next, pour in 1 cup of milk.
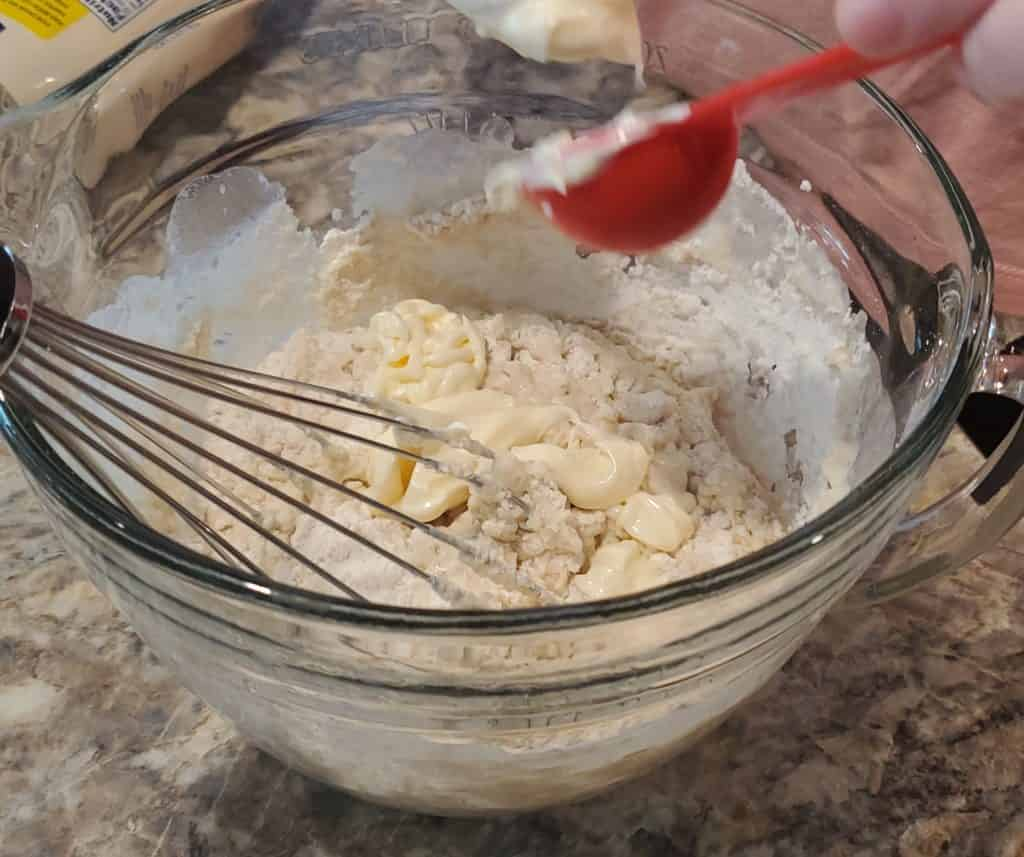
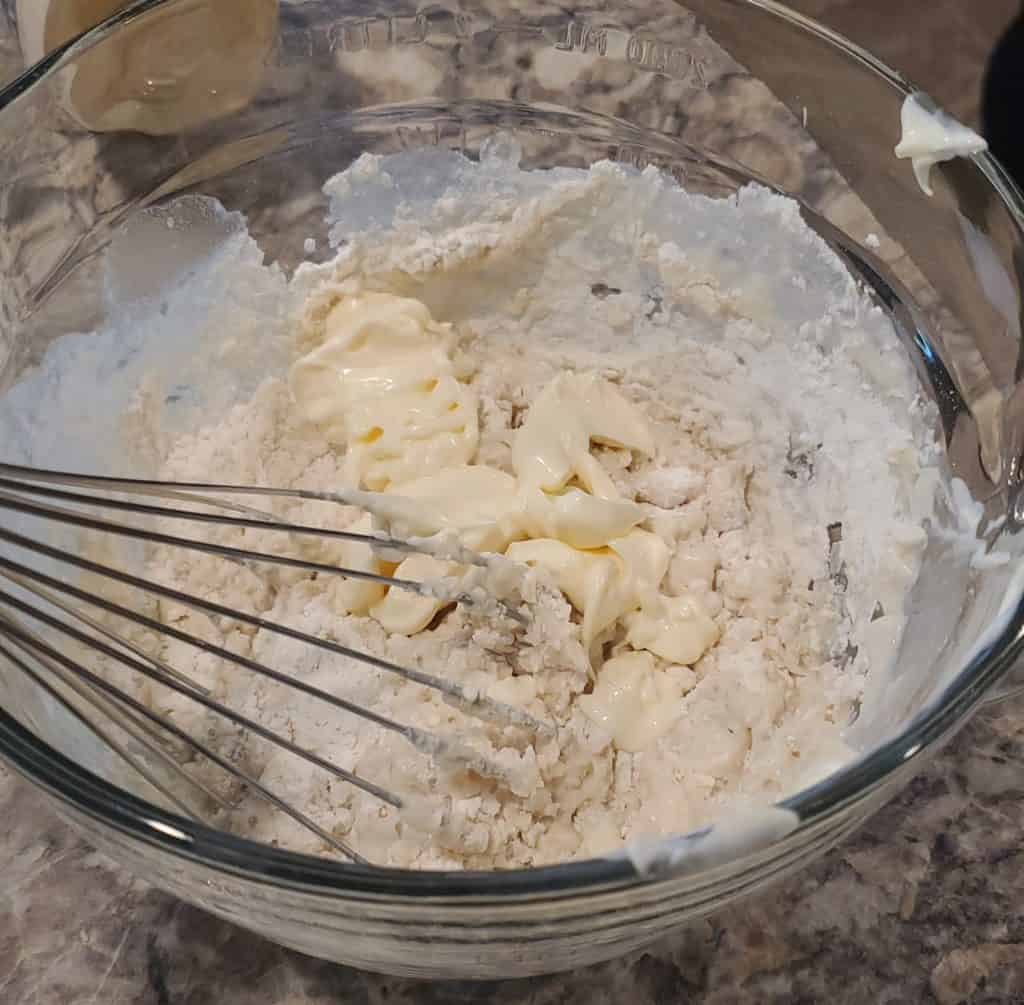
Finally, add 3 heaping tablespoons of mayonnaise. My daughter made these quite “heaping” when we made them. So good!
And then you want to make sure you stir the dough ingredients for this biscuit muffin recipe well together to combine them. Depending on the humidity or lack thereof, your dough may seem a bit dry. You can add up 1/4 cup additional milk if needed. You want the dough to be thick and a bit sticky, like this:
Baking the biscuit muffins
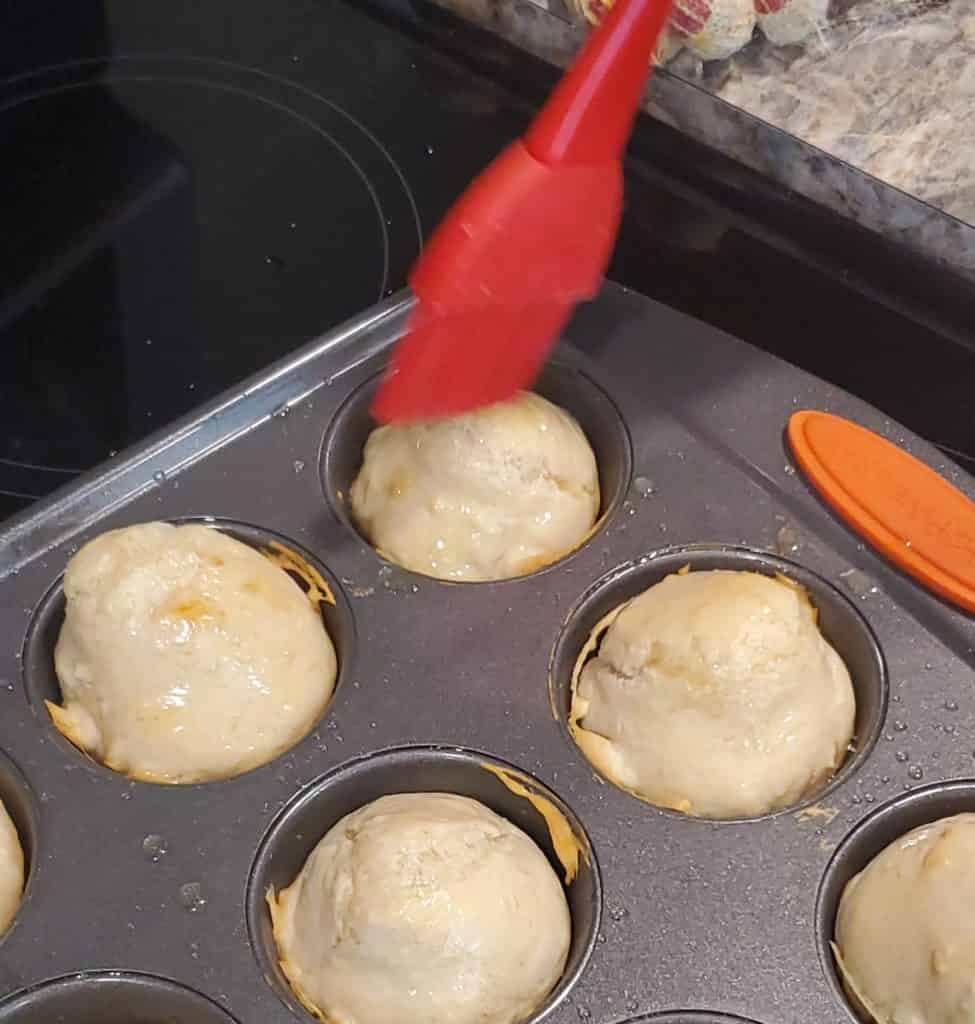
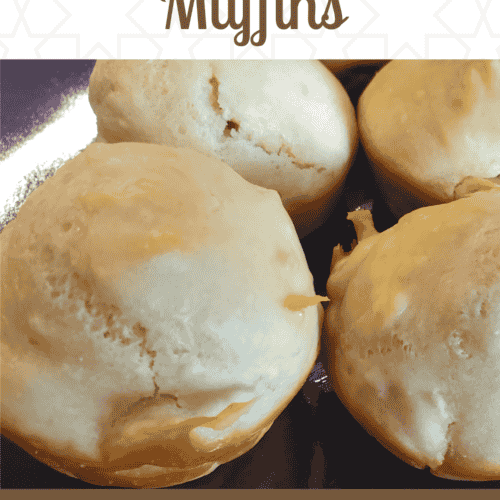
You’re ready to bake! Distribute your biscuit dough evenly into a muffin pan. Although my Rachael Ray muffin pan is non-stick, I still do a light spritz of non-stick cooking spray into the pan before adding the dough. We filled our muffin cups about 3/4 full, but they probably ought to be 2/3 full. I think this biscuit muffin recipe could certainly make 12 biscuit muffins; however, we ended up with only nine.
Bake the biscuit muffins at 375-degrees for 14 to 16 minutes until they are starting to get golden around the edges. They will still be pretty white like biscuits rather than golden like yeast rolls.
If you want, melt about 3 tablespoons of butter just before removing the biscuit muffins from the oven and brush butter over the tops. So delicious!
You can serve them however you’d like. Use them as a side along your meal.
Or make them into their own entree. The night we made them, I turned a couple into breakfast sandwiches for myself. One had precooked bacon with grape jelly and the other had a scrambled egg made in the microwave.
Serve them up warm or at room temperature. Put leftovers into a zip-top bag and store for up to 3 to 5 days.
Biscuit muffins
With just three ingredients, this biscuit muffin recipe is such an easy biscuit recipe you'll make it regularly!
2cupsself-rising flour(Or add 3 teaspoon baking powder and 1/2 teaspoon salt to all-purpose flour)
1cupmilk
3heaping tablespoonsmayonnaise
3tablespoonsbutteroptional
Instructions
Preheat your oven to 375-degrees.
Place the flour in a large mixing bowl.
Pour in 1 cup of milk and then add 3 heaping tablespoons of mayonnaise.
Whisk together well. If the mixture is too dry, add up to 1/4 cup of additional milk until the dough is thick and sticky.
Distribute the dough into a muffin pan that has been coated with non-stick cooking spray. Fill the cups 2/3 full to get 12 biscuit muffins or 3/4 full to get 9 biscuit muffins.
Bake at 375-degree for 14 to 16 minutes until the edges are just slightly browned. Because they are biscuits, they will be more white than golden like yeast rolls.
If desired, melt 3 tablespoons of butter and immediately spread over the biscuits. Serve them warm or at room temperature.
This website uses cookies so that we can provide you with the best user experience possible. Cookie information is stored in your browser and performs functions such as recognising you when you return to our website and helping our team to understand which sections of the website you find most interesting and useful.
Strictly Necessary Cookies
Strictly Necessary Cookie should be enabled at all times so that we can save your preferences for cookie settings.
If you disable this cookie, we will not be able to save your preferences. This means that every time you visit this website you will need to enable or disable cookies again.