Families With Grace

Helping Christian moms create homes filled with grace, love & faith

How to not yell at your kids

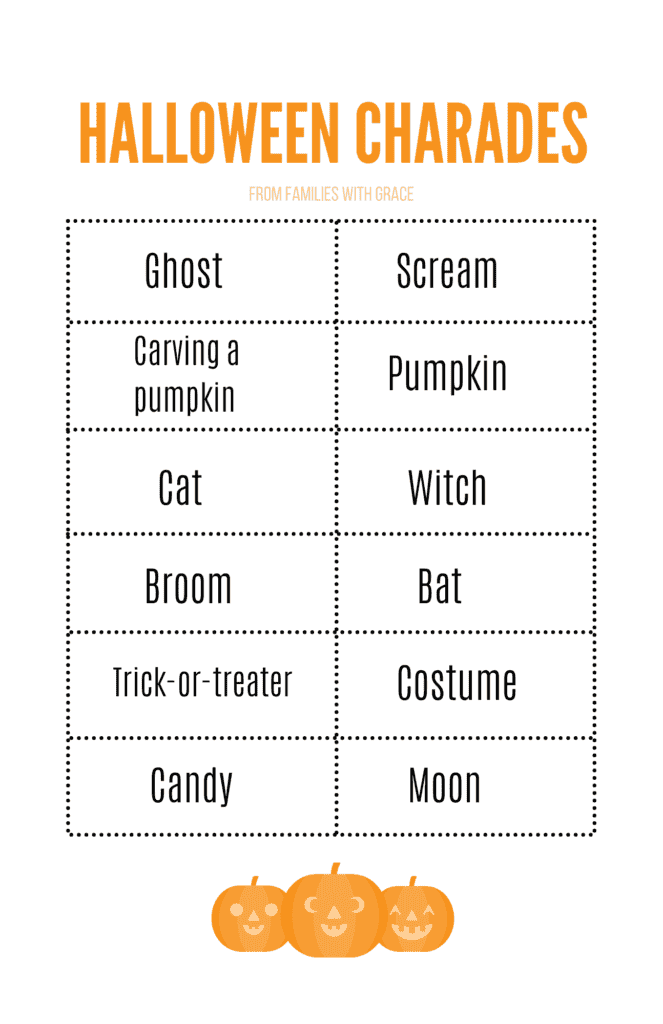
5 Proven tips to help you not yell at your kids

We’ve all seen them. The parents at the playground who yell without abandon at their kids. They’re tired, exasperated and ready to call it quits. Maybe we’ve been that parent ourselves. None of us are perfect, but most of us don’t want to yell at our kids. When we welcomed tiny bundles of joy into the world, we didn’t envision a future spent with yelling and frustration!

But the question remains, can you effectively parent and not yell at your kids? Yes. It really is possible. I’ve been a parent for just a few days shy of 12 years and very, very seldom yell at my kids. And, you know what? My kiddos are both well behaved and their teachers often compliment their behavior.

I know every family is different with different needs and personality types. Check out these tips that work for us and see if maybe they could work for you, too, as you strive to not yell at your kids.

1. Don’t make empty threats.

Empty threats are those threats we know we aren’t going to follow through on — and our kids know that as well. So they don’t take you seriously. Their behavior continues. You get frustrated. To try and get through to them, you resort to raising your voice.

But empty threats don’t work. My husband and I made a plan when our first child was born that we’d not make threats we weren’t willing to follow through on. Sometimes that’s been hard. A couple of times, we’ve gotten into a pickle. However, it’s worked. Before I threaten a consequence for a behavior, I take two seconds to make sure it’s a consequence I will follow through on.

For example, when our oldest was a toddler, we were going to meet a friend of mine for lunch. I was excited to go to lunch. My daughter decided that day she would insist on doing everything herself — as toddlers like to do. In the midst of my frustration as I was trying to make her let me just put her shoes on for her, I nearly said, “If you don’t let me help you, then we’ll just stay home.”

The truth was my friend was coming from out of town, and it was a lunch I’d been looking forward to. Not going really wasn’t an option I’d follow through on. Instead, I shifted strategies and told her I’d count slowly to 10 while she worked on her shoes. If she didn’t finished by then, I would help her. She got to be independent; I got to make sure her shoes were on. We both got to enjoy lunch out.

If I had given the consequence of staying home unless she let me help her and then gone to lunch any way, she would have learned that I don’t always mean what I say. And soon enough, she’d stop listening to my empty threats. She’d continue doing what she wanted. I’d get frustrated and resort to yelling at her. It’s a slippery slope indeed!

Decide that if you are going to threaten a consequence that it’s one you will follow through on should your child not comply. I know it doesn’t sound so much like it has to do with yelling, but I think empty threats lead to yelling more times than not!

2. Have clear and consistent rules.

Another tactic to stop yelling at your kids is to set clear and consistent rules. Just like with empty threats, make sure the rules are reasonable and something you will consistently enforce. For example, one of our rules is that we speak to each other with respect. We don’t abide by name-calling or making fun of anyone. I always enforce that rule. If one of my kids speaks disrespectfully to another family member, they hear about it and usually have a consequence for it. This is a rule with no exceptions. It is also a rule for our entire family and not just the children. My husband and I also talk to our children and each other respectfully.

Other rules are sometimes broken with permission. But those are few and far between. Usually we don’t allow food upstairs at our house. However, during virtual schooling last year, we allowed my daughter to take snacks upstairs sometimes when she was on break.

Along with making rules, be consistent with them. Nothing is more frustrating for a child than inconsistency. If you do one thing one day and it’s OK, but the next day the exact same thing gets you in big trouble, it’s stressful and confusing. This also applies between parents. Talk with your spouse so you’re both on the same page with what’s OK and what isn’t.

My husband and I are usually on the same page when it comes to rules and discipline, but that doesn’t happen by chance. We’ve had many conversations about what is OK and what isn’t. We talk about how we handled situations and see what the other person thinks. Parenting is an evolving process as our kids grow. We have to keep in touch with our spouses about how we are going to handle new phases as they pop up.

Having each other’s back is also important. A couple of times my husband has backed me up when he didn’t necessarily agree with me and vice versa. Later (not in front of the kids) we discussed the situation. But in front of the kids, we showed a united front.

3. Communicate your expectations.

Once my kids were toddlers, I started talking with them before we went places about what I expected from them. I wasn’t giving lengthy speeches, but I’d say things like, “We are going to play with our friends at the park for an hour. But when mommy says it is time to go, don’t give me a hard time. We have an appointment we have to get to.”

Oftentimes I also gave my kids an idea of what to expect in new situations. I still do this to a degree. My son and I went to a meeting last week for an organization he wants to join. I explained up front that I didn’t know exactly what to expect, but we could ask questions. I reminded him that we needed to be on our best behavior.

When going over expectations with my kids, I also rarely bring up times in the past that they didn’t make the correct choice about their behavior. Every so often I will use previous bad behavior as a reminder that if it happens again then we won’t be able to continue a certain activity. But again, I only say something like that if it is completely true.

When kids know what to expect and how they are expected to behave, they usually behave better. And when your kids behave well, it’s easier to not yell at your kids!

4. Address the root of the behavior.

No matter how great your kids are, sometimes they act out or behave poorly because of underlying reasons. And when that happens, no amount of yelling at your kids is going to solve anything. It’s just going to make both of you miserable.

While kids definitely need consequences for unacceptable behavior, sometimes what they also need is for us to take time to listen to them. Recently, my son was having a bad afternoon. The day turned out differently than expected, and he was frustrated. As a result, he made some bad choices and got in trouble for them. About 10 minutes later, the two of us were alone and he mentioned he felt he was unfairly treated by having a consequence for the behavior. He was calm about it and not defiant in any way. He was just being honest.

So, I sat down with him on his level. I explained his behavior warranted consequences and then asked why he was off that afternoon. He opened up and shared his feelings and why he was so frustrated. We talked it through. I listened to him. I commiserated with him, I understood him, and then I encouraged him. Together we decided the rest of the afternoon and evening would be good. And it was!

That heart-to-heart moment with my son took no more than five minutes. I understood where he was coming from. The consequence for his behavior remained, but he also felt listened to and validated. That’s what we all need. Had we not had that conversation, I’m guessing the rest of the day would have included more poor choices, resulting in my husband or me losing our temper and raising our voices. Getting to the root of the problem kept that from happening.

Another positive of getting to the root of the problem is letting our kids know that we are their safe place when they are upset. They can talk to us about anything. My conversation with my son started because he was sincerely telling me how he felt about getting in trouble. I want him to be able to do that. I have encouraged my kids to talk to us. Of course, I’ve had times that their honesty has made me bristle and I’ve had to keep it in check. But communication is what makes for good relationships. Talking is a much better way to communicate than yelling for sure!

5. Know when yelling is OK.

So even though yelling at your kids isn’t something you want to do on a regular basis, sometimes yelling is OK. The biggest time is when your kids are doing something dangerous and you need to get their immediate attention. Because my husband and I don’t yell often, when we do, our kids pay attention.

A few weeks ago, we were in the kitchen before dinner and my son started to reach for something right over a hot baking sheet that was on the counter. I yelled at him to stop. He immediately jumped back. While it scared him, I was OK with that because I needed to get his attention right away before he got burned. If he was somewhat de-sensitized to my yelling because I yelled all the time, I’m not sure his reaction would have been quick enough to save him from getting hurt.

And then there are times when the child is just not listening and continuing the bad behavior. The usual mode of operation in our family is to give two or three warnings to stop before we raise our voice. We don’t often have to raise our voices. But every so often we need to in order to get our kids’ attention so they actually listen and stop their behavior.

However, yelling at our kids is never our first response, unless they are in danger. If we yell at them unfairly, we apologize for doing so. Apologizing gives us the opportunity to show our kids that adults mess up and need grace, too.

Want more? Don’t miss these posts!

Plan a Halloween party at home (with recipes and FREE Halloween charades!)

Everything you need for a fun and easy Halloween party at home!

Affiliate links are used in this post. If you make a qualifying purchase via my link, I receive a small percentage of the sale at no additional cost to you. I only recommend products and services I use and love. It helps support my blog, so thank you for your support! Read my full disclosure here.

Last year we knew that trick-or-treating wouldn’t be an option for our kiddos in the midst of COVID-19. This year, things aren’t looking so great either. But we did learn last year how to throw a fun Halloween party at home that our kids enjoyed more than even trick-or-treating. I know. It was hard for me to believe, too. And the party didn’t take lots of planning, time or money.

Because we had all sheltered in, we included grandparents for our Halloween celebration. Everyone wore a costume. We had snacks, games and lots of fun! Most of the decorations were things my family and I made, which is an accomplishment considering I’m craft-challenged. But it all turned out great!

Halloween party DIY decorations

Decorations that are easy to do are my favorites. And all of these are easy. Basically with some construction paper, markers, crayons and scissors you can make most of them! (I did very little shopping for this party. Most stuff I had on hand at home because it was so basic!)

Paper ghosts

One of the biggest hits for our decor was these paper ghosts. When it comes to Halloween, I’m all about fun decorations and not scary ones. So I cut out some ghost shapes out of white construction paper and then my husband, kids and I all decorated them. We had various themes for each of them. They turned out so incredibly cute! We hung them with fishing line and tape.

I used white construction paper folded in half and cut out this shape for the ghosts. (The fold in half was so I could cut two at a time.) You can make it any shape you like! And you can make them different shapes as well.
A few of the finished ghosts that we decorated with markers and crayons. You can tell that we didn’t go super spooky! And, each ghost comes complete with its own back story that we came up with while working on them.

Light covers

My original plan was to cut out pumpkin shapes and have us decorate them. Then my son suggested that instead we cut jack-o-lanterns out of construction paper and tape them to our dining room light. It was cute. They didn’t look perfect, but that didn’t matter. They turned out well and were nice and festive.

The pumpkin light cover turned out pretty cute! I put them on with tape and did so just before the party. I didn’t want to worry about the over-heating or anything.
Another look at the pumpkin light. This was the first one I put up. Cute and easy!

Monster door

This monster door isn’t new to us. We did this a couple of times on the front door at our old house. But especially since we were almost never leaving the house, I decided to have the monster door be inside instead on our pantry door. We just used crepe paper (which I had from birthdays), paper plates, 2-inch painters tape and markers.

I flipped over the paper plates. We had two sizes, so we made his eyes different sizes this year, but we have also made them the same size. Then I cut out black circles to glue onto the plates and make the eyes. My son cut a nose out of a paper plate and colored it. You can also make the nose with construction paper. Then painters tape made up the mouth. Easy peasy and adorable! We had the monster door at our house for most of the month of October.

Jack-o-lanterns

Of course you can’t forget jack-o-lanterns for Halloween. We let each of our kiddos pick out a pumpkin and then decide how they wanted to decorate it. One decided to carve and the other decided to paint. For the carved pumpkin, we used a battery-powered tea light inside of it. We set both of them on the hearth of the fireplace for additional ambiance.

Easy and delicious Halloween-themed food

Every good party has to have food! I didn’t want to order pizza, because Halloween is one of the busiest nights for pizza places. And I also wanted to control when the food was ready so we weren’t waiting around for it. I’m not a master chef, but I found a few recipes that were festive and went well for our party. I served up some grapes, a veggie platter and cheese balls along with the following festive Halloween food.

Jack-o-lantern sandwiches

Of all the food I made for the party, this took the most time simply because I had to cut out the jack-o-lantern faces. But they turned out so cute that I’d totally do it again. And they were so delicious! Refrigerated pie crusts give these a decadence that works well with the salty ham and cheese.

Jack-o-lantern ham and cheese pockets

Ingredients
  

  • 1 box refrigerated pie crusts
  • 8 oz. thinly sliced Black Forest or Virginia ham
  • 8 oz. thinly sliced Cheddar or Swiss cheese
  • 1 large egg beaten
  • 1-2 tbs. honey mustard

Instructions
 

  • Heat the oven to 425-degrees. Line a rimmed baking sheet with nonstick foil.
  • Unroll the pie crusts. Use a 3-inch cookie cutter to cut each crust into 24 pumpkin shapes. With a sharp knife, cut out eyes and a nose from 12 of the cutouts. Place the 12 plain pumpkins on your baking sheet.
  • Top each of the plain pumpkin cut-outs with a slice or two of ham, folded to fit. (You could also cut out the ham into circles, but that seemed like too much extra work to me!)
  • Put about 1/2 teaspoon of honey mustard on top of the ham.
  • Layer a slice or two of cheese on top of that and then top with another slice or two of ham. (I say "a slice or two" because it depends on your preference. I did one slice each with mine because my family's preferences.)
  • Brush the beaten egg around edges. Top with the pumpkins faces, then carefully press on the edges to seal.
  • Brush tops with beaten egg.
  • Bake for 12 to 15 minutes until light golden.
  • Let them cool for about 5 minutes before serving.

Reese’s Pieces cookie bars with eyes

I love Reese’s Pieces. They are so incredibly good. When I came across this recipe from Betty Crocker for Reese’s Pieces cookie bars that included candy eyes, I knew I had to make them for our Halloween party at home. I love that these can be made ahead of time. Cookie bars are also grand because you just mix them, bake them in one pan and then cut them. They’re less work than making actual cookies. This particular recipe uses a pouch cookie mix, so it’s even easier. Look how cute they are! And so yummy!

These Betty Crocker Reese’s Pieces cookie bars use a pouch cookie mix for a base and are easy to put together!

Sweet festive popcorn

I love popcorn. My mom and son love it, too. I was curious when I came across a recipe for sweet popcorn, so I decided I had to try making it. I learned some things from the Halloween batch I made and made it better at Christmas. So, I’m going to show you the Halloween batch, but give you the instructions I learned later to make it better!

Ingredients
2 bags of microwave popcorn, popped
1 12-ounce package of candy melts (I used orange for Halloween)
Halloween sprinkles, optional

Directions:
1. Pop two bags of white popcorn in the microwave. Spread it out on wax paper or parchment paper.
2. Put the candy melts in a microwave-safe bowl. (I used a large glass bowl.)
3. Heat the candy melts in the microwave in 30-second intervals, stirring in between, until they are fully melted.
4. Carefully pour the melted candy over the popcorn. Move the popcorn around with a spoon if needed to get most of the pieces coated.
5. Sprinkle the sprinkles over the top if desired.
6. Let it sit until cool before placing it in a bowl. Store in an airtight or zip-top container. It lasts for a few days of snacking!

PBJ spider sandwiches

Since my husband and son are more particular eaters who I knew wouldn’t eat the ham and cheese pockets, I looked for something they’d enjoy. These PBJ spider sandwiches were just the thing! I made both PBJ and plain peanut butter sandwiches (as you can see from the smear on one in the photo to denote it is plain). My son doesn’t like jelly.

I used a drinking glass to cut the sandwiches into rounds and then stuck in the pretzel stick legs. Easy-peasy and festive. These would be great to send in your kiddo’s lunchbox on Halloween as well!

Fun, simple Halloween party activities

While decorations set the mood and food makes everyone happier, you still need activities for a party to be successful. We’re a relatively low-key bunch, and we live in the Midwest where it can be 75-degrees on Halloween or 30-degrees. We didn’t want to risk planning anything outside. But we came up with some good options and both kids and adults had fun during our Halloween party at home.

Monster egg hunt

The biggest thing for our kids at Halloween is trick-or-treating. During the pandemic, that wasn’t possible. We debated about how to make it happen. We thought about stationing ourselves and our grandparents in different rooms around the house for the kids to visit and get candy from. But then I came across the idea of monster eggs. And that’s what we went with.

Before the party, I tracked down our plastic Easter eggs that were brightly colored, got out some Halloween stickers and got to work making the eggs look a bit more Halloween-ish. I had some face stickers left from a Halloween craft we’d done the previous year and then other Halloween stickers as well. (I love stickers, so I didn’t have to buy any. But if you aren’t a sticker-loving fiend like I am, you can either purchase Halloween stickers or use a Sharpie to draw on them.)

Once they were decorated, I filled the eggs with candy. During the party, we sent the kids upstairs and some of us adults hid the eggs all over downstairs for the kids to come and find. They had fun doing so, and we had the challenge of trying to remember where we put all the eggs! In the end, everyone ended up with candy and was happy. (I kept a candy bucket sitting out throughout the night as well.)

The monster eggs were a hit. If you need eggs, Amazon has your back. Find them here.

Pumpkin ring toss

When we were shopping for pumpkins to decorate, we also looked for a small pumpkin with a tall stem. (Pie pumpkins are a perfect size for this!) We found one and brought it home. Armed with some glow bracelets, we turned off the living room light during our Halloween party at home and had a ring toss to see who could get the most rings (a.k.a. glow bracelets) on the pumpkin’s stem.

Halloween charades

Charades is one of my kids’ favorite games to play. So, we had to include it for some Halloween party fun. We came up with our own ideas, so I’ve put them together in a free printable for you. There are two versions: one with pictures and one without. If you have an early reader who wants to participate, the one with pictures would work well for triggering their reading. I like the picture version as well to make it easier for my 8-year-old who is dyslexic. Click on either image to download and print the version you prefer.

Halloween Bingo

Our final activity for our Halloween party at home was Halloween Bingo. You can buy adorable Halloween Bingo games online. Or you can find free printable ones to use. Since we had a small group, I went with the free printable route and then we used candy corn for our game markers. Yep, we totally snacked on some along the way. If you don’t like candy corn, you can use another candy, marshmallows or even cereal to mark your game.

My favorite site for free printables for games and activities is DLTK Kids. (I have no affiliation with them whatsoever.) They offer lots of easy-to-customize options. I have used their site many times for Sunday School classes and my own kiddos. DLTK Kids has a page full of a variety of Halloween activities for kids, including Halloween Bingo.

This is life with dyslexia

A 24-hour look at life with a dyslexic child

Recently, I went into my son’s room to wake him up for school. Being tired, he protested a bit. I told him I understood but it was time to get up and have a good day. He replied that he wouldn’t have a good day. In fact, throughout the entire morning, he talked about not having a good day.

Yes, it sounds dramatic. Kids can be dramatic. But this wasn’t about drama. It wasn’t about my son being difficult. It was because that day meant more assessment testing in reading. And he was trying so hard on the test, yet not being effective at it. This is life with dyslexia.

On the way home from school the previous day, he told me he silently cried in his head while working on his test. His teacher told the class not to guess their answers, but he just couldn’t read the text and was stressed. He describes the letters as looking slanted, shaky or both. This is life with dyslexia.

That same day I reassured him that all we want is for him to do his best. I reminded him that his dad, his teacher, his school and I know the challenges he has with reading. And we all just want him to do his best. Without missing a beat, he replied that his best isn’t good enough. My heart cracked. This is life with dyslexia.

On the same afternoon, I got a call from the special education coordinator at school seeking more information before we have a meeting to discuss how to best help my son. She needed me to scan and send in a 25-page report about him. This is life with dyslexia.

That evening he was working on a project with his dad building rockets. The kit had a small booklet with information in it about outer space. I mentioned my son could read parts of it instead of having my husband read it all. Without even looking at the text, my son declared it was above his level. This is life with dyslexia.

Still the same evening, my daughter asked whether my son had spelling words, yet. I told her not so far. Then I got a pit in my stomach. Spelling tests are so difficult. All last year as we did virtual schooling, I saw my son work so hard on spelling words. He went over and over them. We got creative with how we practiced them. Then he would get to the test and all the spellings flew out of his head. Sometimes spelling tests ended in tears and often they ended with him beating himself up over all the words he had missed. This is life with dyslexia.

After I saw my son off to school the morning that he insisted would be a bad day, I prayed. I prayed for strength for him. I asked God to be with him. Seeing your child struggle is beyond difficult. Knowing that he is in for a tough time as you send him out the door is heart-wrenching. I want to wrap my arms around him and never let him go. But that wouldn’t help him most in the end. This is life with dyslexia.

Not long after he left, I read my devotion book, and two things struck me. One there is a passage where Jesus refers to the Holy Spirit as our Advocate (John 16:7). My son needs an advocate right now, so that really stuck out to me. God has him covered. And then in the devotion book was a reminder that when we let loved ones go, we can trust that God is covering and taking care of them even more than we are able to. I thanked God for that reminder I so desperately needed. This is life with dyslexia.

As I headed into my office that day, I started thinking about how to help my son. I want him to fly and not fall. His teacher mentioned earlier in the week that the school is short on aides right now, so she wasn’t sure if someone would even be available read his math test to him if needed. I wondered if I’d be allowed to go into school and read things to him in that situation. I actually looked to see if the school had jobs for aides posted. Because I would apply in a heartbeat if I knew it would help my son. This is life with dyslexia.

For the past year, I’ve been doing research. I’ve been learning all I can about dyslexia. I know more now than I did previously, but I don’t feel like I know enough. Can I ever know enough? Probably not. To me, reading has always been a source of joy. I love reading, writing and words in general. Etymology excites me. Grammar makes me happy. Reading a good book is how I relax. Knowing reading and all that goes with it is a source of stress and frustration for my son breaks my heart. This is life with dyslexia.

I also know resources are available to help my son. Dyslexia fonts are available for ebooks. My son has tried such a font and agreed it was easier to read for him. There are audio books. Technology offers talk-to-text. I am thankful for these resources while at the same time sad that we need them. This is life with dyslexia.

I don’t know what the future will hold. I know this school year holds stress ahead. My son is in third grade, which has two standardized tests along with the three usual math and reading assessment progress tests. My heart sinks thinking of the challenges that are coming for him. This is life with dyslexia.

Thankfully we have a school that I think is going to do well in helping him with his challenges. I am impressed with our school in so many ways. We have a meeting coming up, but I don’t really know what to expect. I’m doing yet more research so I know what to even ask for. Mostly, I just want my son to be able to learn without so much extra stress. I know his challenges will always be there, but I have to believe we can make some accommodations for him so it won’t be as incredibly difficult. This is life with dyslexia.

For now, we will keep pressing on. I won’t stop advocating for my son and what he needs. I will be with him every single step of the way. My husband and I will continue to celebrate with him when he gets excited to read a book to us so proudly. He has grown so much, is working so hard and is reading so much better. But his challenges certainly remain. He is a persistent little dude. I have known from the beginning that once he makes up his mind to do something, it’s as good as done. That’s both a frustrating and awesome trait. Managing dyslexia will be no different. Together, our family will work to encourage him, help him, believe in him and love him through any challenge he faces. Because, this is life with dyslexia.

Easy mint chocolate chip mousse recipe

With 5 ingredients and no cooking needed, you’ll fall in love with this mint chocolate chip mousse recipe!

A few weeks ago, my daughter wanted to try making a new recipe. We tried an ice cream based recipe that used chocolate sandwich cookies and mint to make a mint chocolate cake. It was good. But the topping was what we loved the most. It was like a mousse. So that inspired us to do some tweaking and develop this mint chocolate chip mousse recipe. As a lifelong lover of all things mint and chocolate, I have fallen in love with this mousse!

But the flavor isn’t all I love about this mint chocolate chip mousse recipe. I also like that only uses five ingredients and is easy to whip up. In fact, you can make it ahead of time for guests, pop it in the fridge and be ready to go. If you want a less creamy and airy texture, you can stick it in the freezer. But, I love the creamy, airy texture of mousse!

This would also work great as a pie if you pile the mousse on top of a chocolate cookie crumb crust!

Ingredients

Seriously, this mint chocolate chip mousse recipe only needs five ingredients that are pretty basic.

You need one 7-ounce jar of marshmallow creme, one 16-ounce container of heavy whipping cream, 1/4-cup of milk, 1/2 teaspoon of mint or peppermint extract and 3/4- to 1-cup mini semi-sweet chocolate chips. If you want to color your mint chocolate chip mousse, you also need a few drops of green food coloring, but that’s completely optional.

And if you are more of a cookie fan than chocolate chips, you can easily replace the mini chocolate chips for crushed chocolate sandwich cookies. Milk chocolate chips would be a bit rich, so if you go that route, use less of them. You could try dark chocolate as well (that’s what I would love but my family not so much!). Of course, if chocolate isn’t your thing, just skip the chocolate all together and enjoy a mint mousse!

Directions

Pour your heavy whipping cream into a mixer bowl. You can use a stand mixer or a handheld mixer. Use the whisk attachment(s) for the mixer and beat the whipping cream for a few minutes until soft peaks form. Start with a lower level of mixing and gradually increase it as the whipping cream begins to thicken. (If you go too fast too soon, the liquid will splatter out of the bowl.) The whipping cream should look like this:

In a separate bowl, combine the milk, marshmallow cream and mint extract. If you’re going to use food coloring this is the best time to put it in. (I completely forgot to put it in until the next step. So if you forget this, it will work in the step next as well. However, you will end up needing to use more food coloring if you wait until the next step.)

Stir the milk, marshmallow cream, mint extract and optional food coloring together well but carefully so as not to splash out of the bowl. The mixture should be less sticky and look like this:

Next gently fold the whipped cream into the bowl with the marshmallow cream mixture.

Before mixing together
I added the green food coloring in this step since I forgot it in the previous one. I ended up needing to add about double this amount of food coloring gel to get a light green tint to my mousse.
The light, airy mousse all mixed together.

The mousse is all ready for mix-ins. I suggest mini semi-sweet chocolate chips, but you can use the chocolate you prefer or even skip the chocolate all together if you’d rather. I started with 3/4-cup of the mini chips and then added about another 1/4 cup. My kids say I should use less chocolate next time, so the 3/4-cup of mini chocolate chips is probably best. But, if you’re a chocolate lover like I am, feel free to add a full cup or even more. I didn’t think there was any issue with the amount of chocolate chips!

Whatever you decide to mix in, do so gently like you folded in the whipped cream to keep the mousse light and airy.

Once everything is mixed in, the mint chocolate chip mousse is ready! I let mine hang out in the fridge for about an hour before we ate it, but you can eat it right away. Definitely store leftovers covered in the refrigerator. If you want a firmer consistency for your mint chocolate chip mousse, then put it in the freezer.

Mint chocolate chip mousse

Ingredients
  

  • 1 jar marshmallow creme 7 oz.
  • 1 container heavy whipping cream 16 oz.
  • 1/4 cup milk
  • 1/2 teaspoon mint or peppermint extract
  • 3/4 cup mini semi-sweet chocolate chips
  • Green food coloring optional

Instructions
 

  • Pour the heavy whipping cream into a mixing bowl. Using a mixer with the whisk attachment(s), beat the whipping cream until soft peaks form.
  • In a separate bowl, combine the marshmallow cream, milk, mint extract and food coloring (if desired). Stir until combined.
  • Fold the whipping cream into the marshmallow cream mixture.
  • Gently stir in the chocolate chips.
  • Store covered in the refrigerator until serving. For a firmer consistency, store in the freezer. Keep all leftovers in the refrigerator or freezer.

Are you looking for other no-bake, easy and delicious dessert recipes? Check out these!